How to install PHP-FPM with Apache on Ubuntu 20.04

PHP FPM (FastCGI Process Manager) is an alternative to PHP-FastCGI implementation with some additional features, generally used for running heavy web applications.
1. Install Apache
Install Apache and FastCGI module.
1 2 | sudo apt update sudo apt install apache2 libapache2-mod-fcgid -y |
2. Install PHP and PHP-FPM
Install PHP and PHP-FPM.
1 | sudo apt install php php-fpm -y |
Check the status of the php-fpm service.
1 | sudo systemctl status php7.4-fpm |
3. Configure Apache
Activate the required module.
1 | sudo a2enmod actions fcgid alias proxy_fcgi |
Configure the virtual host to run PHP-FPM.
1 | sudo nano /etc/apache2/sites-available/000-default.conf |
Add the below configuration between VirtualHost tag.
1 2 3 | <FilesMatch \.php$> SetHandler "proxy:unix:/var/run/php/php7.4-fpm.sock|fcgi://localhost" </FilesMatch> |
Restart Apache.
1 2 | sudo systemctl restart apache2 sudo systemctl status apache2 |
4. Testing
Create a PHP script that display PHP information.
1 | sudo echo "<?php phpinfo(); ?>" > /var/www/html/info.php |
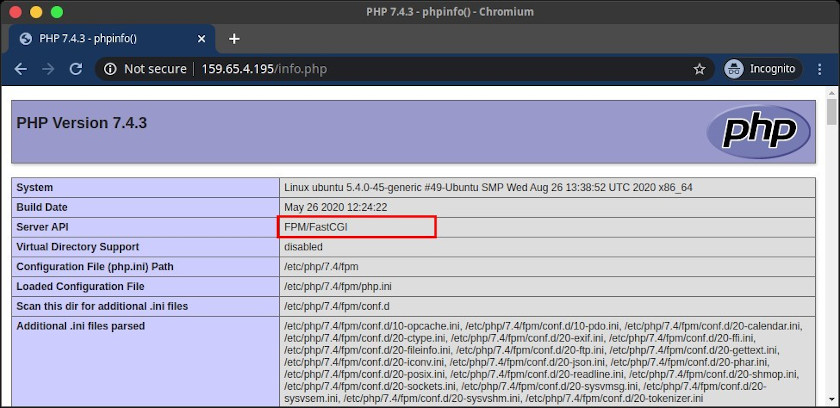
Access http://localhost/info.php or http://serverIP/info.php. In the Server API the value is FPM/FastCGI.

If you found this article helpful and would like to support my work, consider making a donation through PayPal. Your support helps me continue creating useful content and tutorials. Thank you!
Donate via PayPal: https://paypal.me/musaamin


Hello, following your tutorial I end with an “Access denied.” message. I’m using ubuntu 20.04, Apache 2.4.41 and php7.4. Any ideas on how to solve it? Thank you in advance.
check folder permissions