Deploy Droplet DigitalOcean dengan Terraform

Terraform adalah sebuah tool infrastructure as code (IaC) untuk provisioning yang dikembangkan oleh HashiCorp. Terraform memungkinkan untuk membangun, mengubah, dan membuat versi infrastruktur dengan aman dan efisien.
IaC sendiri adalah proses mengelola dan menyiapkan infrastruktur dengan menggunakan kode (text files, configuration file, command line) tanpa melalui GUI atau Web UI. Seperti mengelola compute, storage, dan networking.
Penerapan IaC dapat secara otomatis mengelola infrastruktur. IaC akan terasa manfaatnya ketika infrastruktur yang dikelola dalam skala besar dan harus segera dieksekusi dalam waktu yang singkat.
Terraform mendukung berbagai cloud provider seperti AWS, Azure, Google Cloud Platform, Alibaba Cloud, dan termasuk DigitalOcean.
Cara Kerja Terraform
Terraform mengelola resources pada platform cloud melalui Application Programming Interfaces (API).

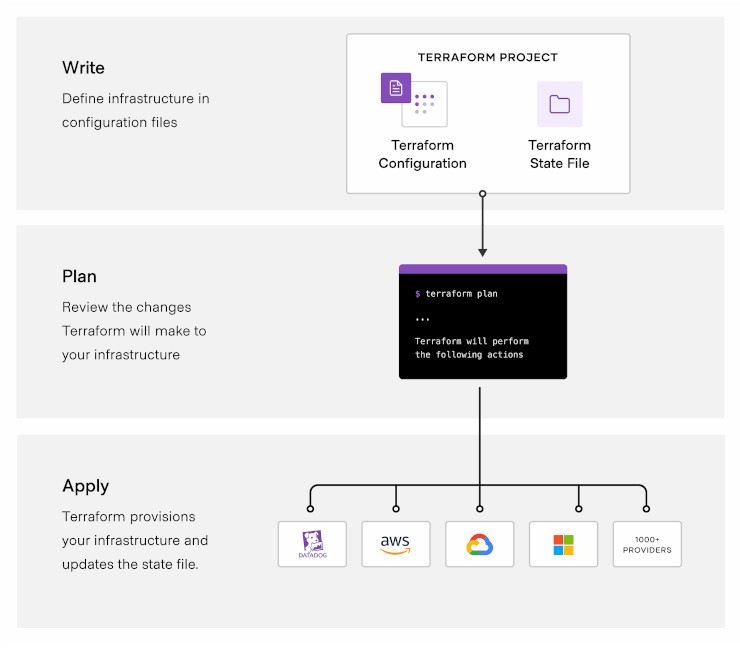
Alur kerja Terraform terdiri dari 3 tahap, yaitu:
- Write: Menuliskan resources yang ingin dikelola. Misalnya, membuat konfigurasi untuk deploy aplikasi pada virtual machine di jaringan Virtual Private Cloud (VPC) dengan security groups (firewall) dan load balancer.
- Plan: Membuat rencana eksekusi yang menjelaskan infrastruktur yang akan dibuat, diperbarui, atau dihancurkan berdasarkan konfigurasi.
- Apply: Mengeksekusi konfigurasi dalam urutan yang benar dan tetap memperhitungkan dependensi yang ada. Misalnya, memperbarui properti VPC dan mengubah jumlah virtual machine di VPC tersebut, Terraform akaan membuat ulang VPC sebelum memperbesar jumlah virtual machine.
0. Deskripsi Tutorial
Tutorial ini menjelaskan bagaimana tahapan dalam membuat droplet DigitalOcean secara otomatis dengan menggunakan Terraform.
Yang perlu disiapkan, yaitu:
- DigitalOcean Personal Access Token
- SSH Key
- Terraform
1. Personal Access Token
Membuat Personal Access Token yang menjadi kunci bagi Terraform untuk mengakses API DigitalOcean.
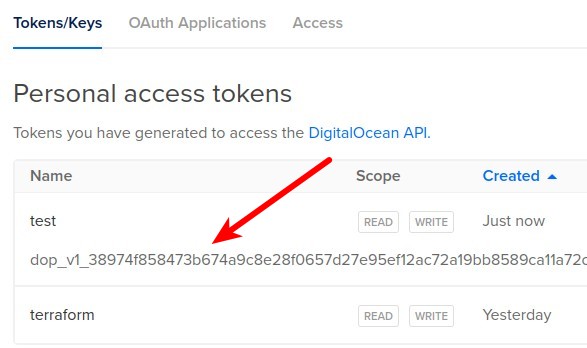
- API -> Tokens/Keys
- Klik Generate New Token
- Berikan nama key di Token name
- Pilih masa aktif key di Expiration, misal 90 days
- Klik Generate Token
- Simpan token yang ditampilkan, karena hanya sekali saja ditampilkan.
2. SSH Key
Komputer yang digunakan pada tutorial ini memakai sistem operasi Linux.
Membuat SSH key di Linux.
1 | ssh-keygen |
Jawab dengan menuliskan lokasi penyimpanan file key dan nama filenya.
1 | /home/namauser/.ssh/nama-ssh-key |
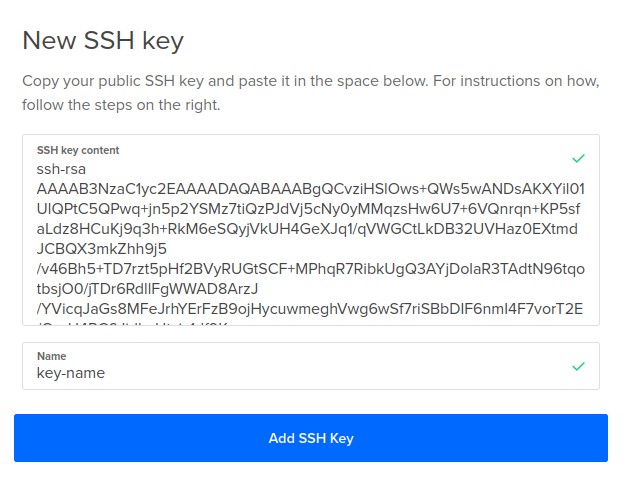
Memasukkan Public SSH Key di akun DigitalOcean.
- Settings -> Security
- Klik Add SSH Key
- Masukkan key di SSH key content
- Berikana nama key di Name
- Klik Add SSH Key
3. Install Terraform
Terraform mendukung sistem operasi macOS, Windows, Linux, FreeBSD, OpenBSD, dan Solaris. Pada tutorial ini menggunakan sistem operasi Linux Ubuntu.
Install Terraform di Ubuntu.
1 2 3 | curl -fsSL https://apt.releases.hashicorp.com/gpg | sudo apt-key add - sudo apt-add-repository "deb [arch=amd64] https://apt.releases.hashicorp.com $(lsb_release -cs) main" sudo apt update && sudo apt install terraform -y |
4. Konfigurasi Terraform untuk DigitalOcean
Membuat environment variable DO_PAT untuk menyimpan DigitalOcean Personal Access Token.
1 | export DO_PAT="masukkan_personal_access_token" |
Membuat folder penyimpanan konfigurasi Terraform untuk DigitalOcean.
1 2 | mkdir tf-do cd tf-do |
Membuat file provider.tf.
1 | nano provider.tf |
Masukkan konfigurasi Terraform dengan provider DigitalOcean.
1 2 3 4 5 6 7 8 9 10 11 12 13 14 15 16 17 18 19 | terraform { required_providers { digitalocean = { source = "digitalocean/digitalocean" version = "~> 2.20" } } } variable "do_token" {} variable "pvt_key" {} provider "digitalocean" { token = var.do_token } data "digitalocean_ssh_key" "nama-ssh-key" { name = "nama-ssh-key" } |
- Menentukan version, cek di Registry Terraform – DigitalOcean, versi berapa yang tersedia.
- nama-ssh-key adalah nama SSH key yang sebelumnya dimasukkan di akun DigitalOcean.
Inisialisasi Terraform.
1 | terraform init |
Perintah di atas membaca konfigurasi provider dan memasang plugin yang dibutuhkan.
1 2 3 4 5 6 7 8 9 10 11 12 13 14 15 16 17 18 19 20 21 22 23 24 25 26 27 | > terraform init Initializing the backend... Initializing provider plugins... - Finding digitalocean/digitalocean versions matching "~> 2.20"... - Installing digitalocean/digitalocean v2.20.0... - Installed digitalocean/digitalocean v2.20.0 (signed by a HashiCorp partner, key ID F82037E524B9C0E8) Partner and community providers are signed by their developers. If you'd like to know more about provider signing, you can read about it here: https://www.terraform.io/docs/cli/plugins/signing.html Terraform has created a lock file .terraform.lock.hcl to record the provider selections it made above. Include this file in your version control repository so that Terraform can guarantee to make the same selections by default when you run "terraform init" in the future. Terraform has been successfully initialized! You may now begin working with Terraform. Try running "terraform plan" to see any changes that are required for your infrastructure. All Terraform commands should now work. If you ever set or change modules or backend configuration for Terraform, rerun this command to reinitialize your working directory. If you forget, other commands will detect it and remind you to do so if necessary. |
5. Membuat Droplet
Membuat file konfigurasi droplet, misal www-1.
1 | nano www-1.tf |
Masukkan konfigurasinya.
1 2 3 4 5 6 7 8 9 10 11 12 13 14 15 16 17 18 19 20 21 22 23 24 25 26 | resource "digitalocean_droplet" "www-1" { image = "ubuntu-22-04-x64" name = "www-1" region = "sgp1" size = "s-1vcpu-1gb" ssh_keys = [ data.digitalocean_ssh_key.nama-ssh-key.id ] connection { host = self.ipv4_address user = "root" type = "ssh" private_key = file(var.pvt_key) timeout = "2m" } provisioner "remote-exec" { inline = [ "export PATH=$PATH:/usr/bin", # install nginx "sudo apt update", "sudo apt install -y nginx" ] } } |
- Membuat droplet dengan nama www-1
- Memakai image Ubuntu 22.04
- Lokasi data center di Singapore 1
- Memakai SSH Key nama-ssh-key
- Mengakses SSH
- Menjalankan command update dan install nginx
Block connection dan provisioner tidak wajib ada kalau hanya ingin membuat droplet saja tanpa menjalankan command lain setelah droplet selesai dibuat.
Menjalankan terraform plan untuk mengetahui seperti apa droplet yang dihasilkan dari konfigurasi di atas.
1 2 3 | terraform plan \ -var "do_token=${DO_PAT}" \ -var "pvt_key=$HOME/.ssh/nama-private-key" |
Hasil perintah di atas.
1 2 3 4 5 6 7 8 9 10 11 12 13 14 15 16 17 18 19 20 21 22 23 24 25 26 27 28 29 30 31 32 33 34 35 36 37 38 39 40 41 42 | Terraform used the selected providers to generate the following execution plan. Resource actions are indicated with the following symbols: + create Terraform will perform the following actions: # digitalocean_droplet.www-1 will be created + resource "digitalocean_droplet" "www-1" { + backups = false + created_at = (known after apply) + disk = (known after apply) + graceful_shutdown = false + id = (known after apply) + image = "ubuntu-22-04-x64" + ipv4_address = (known after apply) + ipv4_address_private = (known after apply) + ipv6 = false + ipv6_address = (known after apply) + locked = (known after apply) + memory = (known after apply) + monitoring = false + name = "www-1" + price_hourly = (known after apply) + price_monthly = (known after apply) + private_networking = (known after apply) + region = "sgp1" + resize_disk = true + size = "s-1vcpu-1gb" + ssh_keys = [ + "23804655", ] + status = (known after apply) + urn = (known after apply) + vcpus = (known after apply) + volume_ids = (known after apply) + vpc_uuid = (known after apply) } Plan: 1 to add, 0 to change, 0 to destroy. ──────────────────────────────────────────────────────────────────────────────────────────────────────────────────────────────────────────────────────────────────────── Note: You didn't use the -out option to save this plan, so Terraform can't guarantee to take exactly these actions if you run "terraform apply" now. |
Menjalankan terraform apply untuk mengeksekusi pembuatan droplet.
1 2 3 | terraform apply \ -var "do_token=${DO_PAT}" \ -var "pvt_key=$HOME/.ssh/nama-private-key" |
Hasil perintah di atas. Jawab “yes” untuk melanjutkan pembuatan droplet.
1 2 3 4 5 6 7 8 | ... Plan: 1 to add, 0 to change, 0 to destroy. Do you want to perform these actions? Terraform will perform the actions described above. Only 'yes' will be accepted to approve. Enter a value: yes |
Jika berhasil, baris terakhir tampil pesan Apply complete! Resources: 1 added, 0 changed, 0 destroyed..
1 2 3 4 5 6 7 8 9 10 | ... digitalocean_droplet.ubuntu (remote-exec): No user sessions are running outdated digitalocean_droplet.ubuntu (remote-exec): binaries. digitalocean_droplet.ubuntu (remote-exec): No VM guests are running outdated digitalocean_droplet.ubuntu (remote-exec): hypervisor (qemu) binaries on this digitalocean_droplet.ubuntu (remote-exec): host. digitalocean_droplet.ubuntu: Creation complete after 1m35s [id=301789883] Apply complete! Resources: 1 added, 0 changed, 0 destroyed. |
Menampilkan status atau informasi dari environment saat ini.
1 | terraform show terraform.tfstate |
Hasilnya.
1 2 3 4 5 6 7 8 9 10 11 12 | ... # digitalocean_droplet.www-1: resource "digitalocean_droplet" "www-1" { backups = false created_at = "2022-05-29T03:49:05Z" disk = 25 graceful_shutdown = false id = "301789883" image = "ubuntu-22-04-x64" ipv4_address = "159.223.53.116" ipv4_address_private = "10.130.0.2" ... |
Jika droplet atau resources diubah tidak menggunakan droplet, tfstate tidak akan sama lagi atau tidak diperbarui. Untuk itu perlu menjalankan terraform refresh agar tfstate diperbarui.
1 2 3 | terraform refresh \ -var "do_token=${DO_PAT}" \ -var "pvt_key=$HOME/.ssh/nama-private-key" |
6. Menghapus Droplet
Menghapus droplet atau resources yang telah dibuat.
1 2 3 | terraform destroy \ -var "do_token=${DO_PAT}" \ -var "pvt_key=$HOME/.ssh/nama-private-key" |
Jawab yes untuk melanjutkan penghapusan resources.
1 2 3 4 5 6 7 | Plan: 0 to add, 0 to change, 1 to destroy. Do you really want to destroy all resources? Terraform will destroy all your managed infrastructure, as shown above. There is no undo. Only 'yes' will be accepted to confirm. Enter a value: yes |
Jika berhasil ditampilkan pesan Destroy complete! Resources: 1 destroyed..
1 2 3 4 5 6 | digitalocean_droplet.www-1: Destroying... [id=301789883] digitalocean_droplet.www-1: Still destroying... [id=301789883, 10s elapsed] digitalocean_droplet.www-1: Still destroying... [id=301789883, 20s elapsed] digitalocean_droplet.www-1: Destruction complete after 21s Destroy complete! Resources: 1 destroyed. |
7. Membuat Banyak Droplet
Membuat banyak droplet dalam satu konfigurasi.
1 2 3 4 5 6 7 8 9 10 | resource "digitalocean_droplet" "www" { count = 2 image = "ubuntu-22-04-x64" name = "www-${count.index}" region = "sgp1" size = "s-1vcpu-1gb" ssh_keys = [ data.digitalocean_ssh_key.nama-ssh-key.id ] } |
Yang perlu ditambahkan yaitu:
- count, jumlah droplet yang mau dibuat
- name, mengubah penulisan name dari droplet dengan menambahkan nomor index
Selamat mencoba 🙂
