Cara Install PHP-FPM dengan Apache di Ubuntu 20.04

PHP FPM (FastCGI Process Manager) adalah alternatif dari implementasi PHP-FastCGI dengan beberapa fitur tambahan, umumnya digunakan untuk menjalankan aplikasi web yang berat.
1. Install Apache
Install Apache dan FastCGI module.
1 2 | sudo apt update sudo apt install apache2 libapache2-mod-fcgid -y |
2. Install PHP dan PHP-FPM
Install PHP dan PHP-FPM.
1 | sudo apt install php php-fpm -y |
Cek status php-fpm service.
1 | sudo systemctl status php7.4-fpm |
3. Konfigurasi Apache
Mengaktifkan module yang dibutuhkan.
1 | sudo a2enmod actions fcgid alias proxy_fcgi |
Mengkonfigurasi virtual host agar menjalankan PHP-FPM.
1 | sudo nano /etc/apache2/sites-available/000-default.conf |
Tambahkan konfigurasi di bawah ini di antara tag VirtualHost.
1 2 3 | <FilesMatch \.php$> SetHandler "proxy:unix:/var/run/php/php7.4-fpm.sock|fcgi://localhost" </FilesMatch> |
Restart Apache.
1 2 | sudo systemctl restart apache2 sudo systemctl status apache2 |
4. Pengujian
Membuat PHP script yang menampilkan informasi PHP.
1 | sudo echo "<?php phpinfo(); ?>" > /var/www/html/info.php |
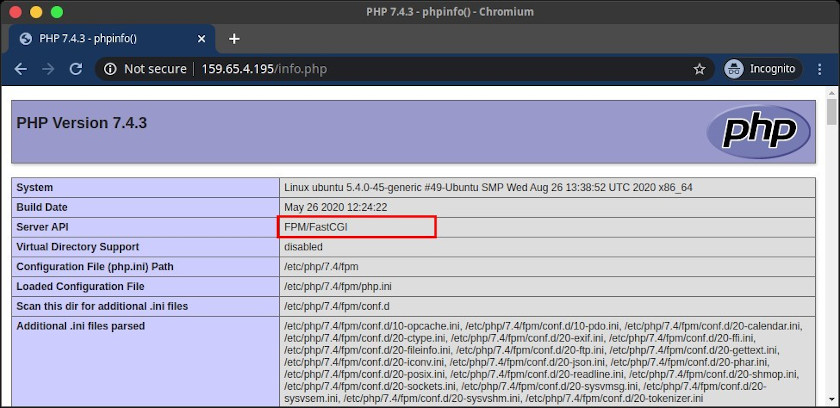
Akses http://localhost/info.php atau http://serverIP/info.php. Pada bagian Server API nilainya adalah FPM/FastCGI.

Selamat mencoba 🙂

