Cara Install SSL Let’s Encrypt Wildcard di Apache + Cloudflare

SSL wildcard adalah tipe sertifikat SSL yang dapat digunakan untuk domain dan seluruh subdomainnya. Jadi dengan SSL wildcard kita tidak perlu lagi membuat sertifikat SSL untuk setiap subdomain, cukup satu sertifikat SSL.
SSL yang diterbitkan oleh Let’s Encrypt sudah mendukung wildcard. Tetapi konfigurasi SSL wildcard berbeda dengan non-wildcard, perlu melakukan konfigurasi tambahan di DNS record.
Di bawah ini adalah contoh permintaan SSL untuk domain.com dan www.domain.com yang terpasang di Apache web server.
1 | certbot --apache -d domain.com -d www.domain.com |
Install SSL non-wildcard sangat mudah, tetapi ketika ingin install SSL untuk subdomain lain kita harus melakukan permintaan untuk subdomain tersebut.
1 | certbot --apache -d sub1.domain.com |
certbot memiliki fitur expand di mana kita bisa memperbarui SSL dan memasukkan subdomain yang baru, sehingga cukup menggunakan satu sertifikat SSL saja.
1 | certbot --expand -d domain.com,www.domain.com,sub1.domain.com,sub2.domain.com |
Tetapi expand SSL masih harus dilakukan berulang kali ketika ada subdomain baru yang ingin diinstallkan SSL. Apalagi jika mengimplementasikan dynamic domain di aplikasi, subdomain akan terus bertambah.
Contoh implementasi dynamic domain, setiap user yang terdaftar di aplikasi memiliki halaman profil sendiri yang URL aksesnya menggunakan subdomain. Seperti WordPress multisite tipe subdomain, user1.domain.com, user2.domain.com, dst. User bertambah, subdomain juga bertambah. Sehingga setiap subdomain baru harus diinstallkan SSL.
Jadi solusi untuk masalah seperti ini adalah menggunakan SSL wildcard. Cukup satu SSL yang dapat digunakan untuk domain dan sebanyak apapun subdomainnya.
Tutorial Environment
Spesifikasi dan konfigurasi yang digunakan di tutorial ini:
- Server: VPS Ubuntu 20.04
- IP server: 188.166.229.126
- Web server: Apache
- SSL: Let’s Encrypt
- Domain: domain.com, sub.domain.com
- DNS server: Cloudflare
DNS Record
Login Cloudflare, arahkan domain ke IP server terlebih dahulu dengan melakukan konfigurasi DNS record. DNS record yang terpasang harus DNS only, karena ingin menggunakan SSL dari Let’s Encrypt.
- Type = A, Name = domain.com, Target = 188.166.229.126
- Type = CNAME, Name = www, Target = domain.com
- Type = CNAME, Name = sub, Target = domain.com
Cloudflare API Token
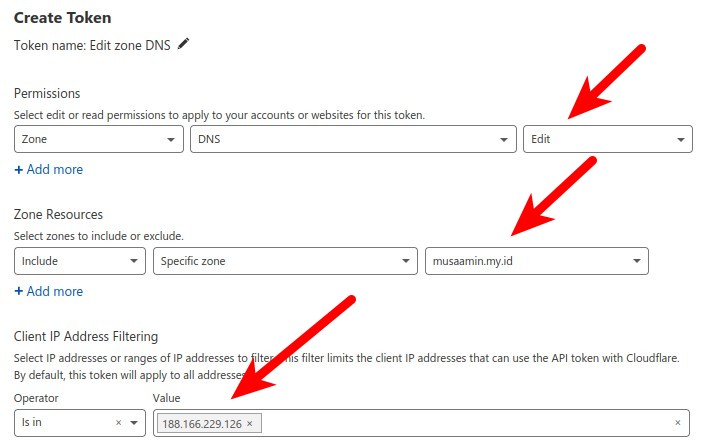
Klik My Profile->API Tokens->Create Token.
Klik Use template (Edit zone DNS).
Zone Resources, pilih domain yang mau digunakan atau diatur DNS recordnya.
Client IP Address Filtering, Is in, Value masukkan IP server.
Lalu Continue to summary, Create Token.

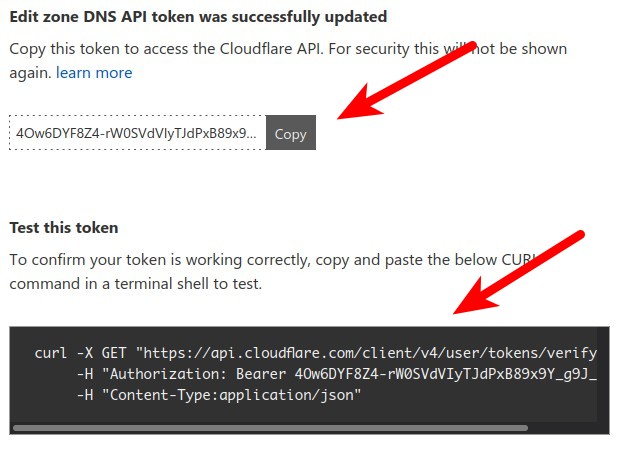
Copy API token yang ditampilkan.
Untuk menguji API token copy perintah CURL dan jalankan di server. Jika berhasil, ditampilkan pesan This API Token is valid and active. Jika gagal, Invalid format for Authorization header.
Klik View all API tokens untuk menampilkan daftar API token.
Klik Roll untuk menampilkan kembali API token.

Login SSH ke server.
Membuat folder dan file untuk menyimpan Cloudflare API token.
1 2 3 4 5 | mkdir /root/.secrets chmod 700 /root/.secrets touch /root/.secrets/cloudflare.ini chmod 600 /root/.secrets/cloudflare.ini nano /root/.secrets/cloudflare.ini |
Masukkan konfigurasi API token.
1 | dns_cloudflare_api_token=PASTE_API_TOKEN |
Install certbot
Install certbot via snap.
1 2 3 4 | snap install --classic certbot ln -s /snap/bin/certbot /usr/bin/certbot snap set certbot trust-plugin-with-root=ok snap install certbot-dns-cloudflare |
Request SSL
Melakukan permintaan SSL dengan melakukan verifikasi domain di DNS Cloudflare.
1 2 3 4 5 | certbot certonly \ --dns-cloudflare \ --dns-cloudflare-credentials /root/.secrets/cloudflare.ini \ -d domain.com \ -d *.domain.com |
Masukkan alamat email untuk menerima notifikasi ketika SSL akan habis masa berlakunya, perlu dilakukan pembaruan SSL.
1 2 | Enter email address (used for urgent renewal and security notices) (Enter 'c' to cancel): saya@email.com |
Jawab ‘Y (Yes)’ untuk menyetujui Terms of Service.
1 2 3 4 5 | Please read the Terms of Service at https://letsencrypt.org/documents/LE-SA-v1.2-November-15-2017.pdf. You must agree in order to register with the ACME server. Do you agree? - - - - - - - - - - - - - - - - - - - - - - - - - - - - - - - - - - - - - - - - (Y)es/(N)o: Y |
Jawab ‘N (No)’ jika tidak ingin dikirimkan informasi ke email.
1 2 3 4 5 6 7 | Would you be willing, once your first certificate is successfully issued, to share your email address with the Electronic Frontier Foundation, a founding partner of the Let's Encrypt project and the non-profit organization that develops Certbot? We'd like to send you email about our work encrypting the web, EFF news, campaigns, and ways to support digital freedom. - - - - - - - - - - - - - - - - - - - - - - - - - - - - - - - - - - - - - - - - (Y)es/(N)o: N |
Permintaan SSL berhasil, tersimpan di folder /etc/letsencrypt.
1 2 3 4 | Successfully received certificate. Certificate is saved at: /etc/letsencrypt/live/domain.com/fullchain.pem Key is saved at: /etc/letsencrypt/live/domain.com/privkey.pem This certificate expires on 2021-09-24. |
Pengujian
Install Apache web server.
1 | apt install apache2 -y |
Ubah konfigurasi default virtual host.
1 | nano /etc/apache2/sites-available/000-default.conf |
Aktifkan opsi ServerName dengan menghapus karakter # dan ganti www.example.com dengan IP server.
1 | ServerName 188.166.229.126 |
Membuat konfigurasi virtual host domain.com port 80 (HTTP).
1 | nano /etc/apache2/sites-available/domain.com.conf |
Masukkan konfigurasi virtual host port 80.
1 2 3 4 5 6 7 8 9 10 11 12 13 14 15 16 17 | <VirtualHost *:80> ServerName domain.com ServerAlias www.domain.com DocumentRoot /var/www/domain.com <Directory /var/www/domain.com> Options Indexes FollowSymLinks MultiViews AllowOverride All Require all granted </Directory> ErrorLog /var/log/apache2/domain.com_error.log CustomLog /var/log/apache2/domain.com_access.log combined RewriteEngine on RewriteCond %{SERVER_NAME} =www.domain.com [OR] RewriteCond %{SERVER_NAME} =domain.com RewriteRule ^ https://%{SERVER_NAME}%{REQUEST_URI} [END,NE,R=permanent] </VirtualHost> |
Membuat konfigurasi virtual host domain.com port 443 (HTTPS).
1 | nano /etc/apache2/sites-available/domain.com-ssl.conf |
Masukkan konfigurasi virtual host port 443.
1 2 3 4 5 6 7 8 9 10 11 12 13 14 15 16 17 | <IfModule mod_ssl.c> <VirtualHost *:443> ServerName domain.com ServerAlias www.domain.com DocumentRoot /var/www/domain.com <Directory /var/www/domain.com> Options Indexes FollowSymLinks MultiViews AllowOverride All Require all granted </Directory> ErrorLog /var/log/apache2/domain.com_error.log CustomLog /var/log/apache2/domain.com_access.log combined SSLCertificateFile /etc/letsencrypt/live/domain.com/fullchain.pem SSLCertificateKeyFile /etc/letsencrypt/live/domain.com/privkey.pem </VirtualHost> </IfModule> |
Membuat juga virtual host untuk sub.domain.com port 80.
1 | nano /etc/apache2/sites-available/sub.domain.com.conf |
Masukkan konfigurasi virtual host sub.domain.com.
1 2 3 4 5 6 7 8 9 10 11 12 13 14 15 | <VirtualHost *:80> ServerName sub.domain.com DocumentRoot /var/www/sub.domain.com <Directory /var/www/sub.domain.com> Options Indexes FollowSymLinks MultiViews AllowOverride All Require all granted </Directory> ErrorLog /var/log/apache2/sub.domain.com_error.log CustomLog /var/log/apache2/sub.domain.com_access.log combined RewriteEngine on RewriteCond %{SERVER_NAME} =sub.domain.com RewriteRule ^ https://%{SERVER_NAME}%{REQUEST_URI} [END,NE,R=permanent] </VirtualHost> |
Membuat konfigurasi virtual host sub.domain.com port 443 (HTTPS).
1 | nano /etc/apache2/sites-available/sub.domain.com-ssl.conf |
Masukkan konfigurasi virtual host sub.domain.com dengan tetap memakai sertifikat SSL yang sama dengan domain utama.
1 2 3 4 5 6 7 8 9 10 11 12 13 14 15 16 | <IfModule mod_ssl.c> <VirtualHost *:443> ServerName sub.domain.com DocumentRoot /var/www/sub.domain.com <Directory /var/www/sub.domain.com> Options Indexes FollowSymLinks MultiViews AllowOverride All Require all granted </Directory> ErrorLog /var/log/apache2/sub.domain.com_error.log CustomLog /var/log/apache2/sub.domain.com_access.log combined SSLCertificateFile /etc/letsencrypt/live/domain.com/fullchain.pem SSLCertificateKeyFile /etc/letsencrypt/live/domain.com/privkey.pem </VirtualHost> </IfModule> |
Membuat folder document root dan file index.html.
1 2 3 4 | cd /var/www mkdir domain.com sub.domain.com echo "domain.com" > domain.com/index.html echo "sub.domain.com" > sub.domain.com/index.html |
Aktifkan virtual host, modul rewrite, restart service apache2, dan cek statusnya apakah berjalan dengan baik.
1 2 3 4 | a2ensite domain.com.conf domain.com-ssl.conf sub.domain.com.conf sub.domain.com-ssl.conf a2enmod rewrite systemctl restart apache2 systemctl status apache2 |
Tes browse https://domain.com dan https://sub.domain.com.
Selamat mencoba 🙂


Kalau disini menggunakan subdomain, kalau subfolder apakah sama ataukah beda?
subfolder tidak perlu lagi konfigurasi SSL karena hanya berupa subfolder bukan subdomain, jadi lebih mudah konfigurasi multisite subfolder
Kalau sudah expired nanti bagaimana perpanjangnya? lakukan langkah yang mana?
jalankan perintah request SSL