Install EPrints 3.4 on Ubuntu 22.04: A Step-by-Step Tutorial

EPrints is an open-source institutional repository software specifically designed to support the management and distribution of digital collections in academic environments. Developed by the University of Southampton in 2000, EPrints has become one of the most well-known and widely used repository solutions worldwide.
EPrints aims to facilitate academic institutions, libraries, and other organizations in managing, storing, and distributing their intellectual output digitally. The software is designed to support open access, ensuring that scholarly information can be accessed and utilized by the public at large.
In this tutorial, we will learn how to install EPrints 3.4 with the following specifications:
- Vultr Cloud Server: 1 CPU, 1 GB RAM, 32 GB Storage
- Operating System: Ubuntu 22.04 LTS
- Subdomain: repo.aminlabs.my.id
- SSL: Let’s Encrypt
- Database: MySQL v8.0
- EPrints: EPrints v3.4.5
- Installation method: installation from the source on GitHub
Note: Register here to get $100 free credit from Vultr.
Step 1: Install required dependencies
Connect to your server and ensure your system packages are up-to-date:
1 2 | apt update apt upgrade -y |
Note: This tutorial uses the root user.
Install all the dependencies for EPrints:
1 2 3 4 5 6 | apt install perl libncurses5 libselinux1 apache2 libapache2-mod-perl2 libxml-libxml-perl \ libunicode-string-perl libterm-readkey-perl libmime-lite-perl libmime-types-perl libdigest-sha-perl \ libdbd-mysql-perl libxml-parser-perl libxml2-dev libxml-twig-perl libarchive-any-perl libjson-perl \ liblwp-protocol-https-perl libtext-unidecode-perl lynx wget ghostscript poppler-utils antiword elinks \ texlive-base texlive-base-bin psutils imagemagick adduser tar gzip unzip libsearch-xapian-perl \ libtex-encode-perl libio-string-perl libdbd-mysql-perl git xpdf python3-html2text make -y |
Step 2: Install MySQL
Install MySQL server and client:
1 | apt install mysql-server mysql-client -y |
Login to MySQL:
1 | mysql |
Create MySQL eprints user:
1 2 3 4 | CREATE USER 'eprints'@'localhost' IDENTIFIED by 'changeme'; GRANT ALL PRIVILEGES ON *.* TO 'eprints'@'localhost' WITH GRANT OPTION; FLUSH PRIVILEGES; exit |
Step 3: Create the EPrints user
Create the EPrints user:
1 | adduser eprints |
Open file /etc/apache2/envvars:
1 | nano /etc/apache2/envvars |
Update Apache configuration to use the eprints user and group by ensuring the specified lines:
1 2 | export APACHE_RUN_USER=eprints export APACHE_RUN_GROUP=eprints |
Restart Apache:
1 | systemctl restart apache2 |
Step 4: Download EPrints source
Create a directory for the EPrints source:
1 2 3 | mkdir /opt/eprints3 chown eprints:eprints /opt/eprints3 chmod 2775 /opt/eprints3 |
Download the EPrints source from GitHub:
1 2 | su -l eprints git clone https://github.com/eprints/eprints3.4.git /opt/eprints3 |
Switch to EPrints v3.4.5:
1 2 | cd /opt/eprints3 git checkout tags/v3.4.5 |
Step 5: Create Repository
Create a publications flavour archive:
1 | bin/epadmin create pub |
Enter archive ID:
1 2 3 4 5 6 7 | Create a pub Repository Please select an ID for the repository, which will be used to create a directory and identify the repository. Lower case letters, numbers and underscores, may not start with a number or underscore. examples: "lemurprints", "test3" or "research_archive" Archive ID? repo |
Configure vital settings, press ENTER:
1 2 3 4 5 6 7 8 9 | Ok. I've created the initial config files and directory structure. I've also created a "disk0" directory under documents/ if you want your full texts to be stored on a different partition then remove the disk0, and create a symbolic link to the directory you wish to store the full texts in. Additional links may be placed here to be used when the first is full. Configure vital settings? [yes] ? ENTER |
Enter the hostname for the repository:
1 2 3 4 5 6 7 8 9 10 11 | Core configuration for repo Please enter the fully qualified hostname of the repository. For a production system we recommend against using the real hostname of the machine. Example: repo.footle.ac.uk Hostname? repo.aminlabs.my.id |
Note: Make sure to replace your_subdomain with your actual subdomain.
Webserver port, press ENTER:
1 2 3 4 | Please enter the port of the webserver. This is probably 80, but you may wish to run apache on a different port if you are experimenting. Webserver Port [80] ? ENTER |
Alias for hostname, press ENTER:
1 2 3 4 5 6 7 8 9 10 11 12 13 | Please enter all the aliases which could reach the repository, and indicate if you would like EPrints to write a Redirect Rule to redirect requests to this alias to the correct URL. Some suggestions: aminlabs.example.org aminlabs.example aminlabs repo.aminlabs repo Enter a single hash (#) when you're done. Alias (enter # when done) [#] ? ENTER |
Repository’s base URL, press ENTER:
1 2 3 4 | Please enter the path part of the repository's base URL. This should probably be '/'. Path [/] ? ENTER |
Enter hostname for HTTPS:
1 2 3 4 | If you will use https for your user pages (including login) enter the https hostname here, or leave blank when using http only. HTTPS Hostname [] ? repo.aminlabs.my.id |
Secure webserver port, press ENTER:
1 2 3 | Please enter the port of your secure (https) server. This is probably 443. Secure Webserver Port [443] ? ENTER |
Enter email for administrator account:
1 | Administrator Email? repo@aminlabs.my.id |
Enter the name of the repository:
1 2 3 4 5 6 | Enter the name of the repository in the default language. If you wish to enter other titles for other languages or enter non ascii characters then you may enter something as a placeholder and edit the XML config file which this script generates. Archive Name [Test Repository] ? AminLabs Repository |
Enter organisation name:
1 2 3 4 5 6 | Enter the name of the organisation in the default language. Again, if you wish to enter other titles for other languages or enter non ascii characters then you may enter something as a placeholder and edit the XML config file which this script generates. Organisation Name [Organisation of Test] ? AminLabs |
Writer the core settings, press ENTER:
1 | Write these core settings? [yes] ? ENTER |
Configure database, press ENTER:
1 | Configure database? [yes] ? ENTER |
Database configuration, press ENTER:
1 2 3 4 5 6 7 8 9 10 11 | Database Name [repo] ? ENTER MySQL Host [localhost] ? ENTER You probably don't need to set socket and port (unless you do!?). MySQL Port (# for no setting) [#] ? ENTER MySQL Socket (# for no setting) [#] ? ENTER Database User [repo] ? ENTER Database Password [pqpVxhhgg7zdZznR] ? ENTER Database Engine [InnoDB] ? ENTER Write these database settings? [yes] ? ENTER |
Enter MySQL superuser:
1 2 3 4 5 6 7 | EPrints can create the database, and grant the correct permissions. Create database "repo" [yes] ? ENTER Create database "repo" [yes] ? Database Superuser Username [root] ? eprints Database Superuser Password? PASSWORD Create database tables? [yes] ? ENTER |
Create administrator account:
1 2 3 4 5 6 7 | Create an initial user? [yes] ? ENTER Creating a new user in repo Enter a username [admin] ? ENTER Select a user type (user|editor|admin) [admin] ? ENTER Enter Password? PASSWORD Email? repo@aminlabs.my.id |
Build the static web pages, press ENTER:
1 2 3 | Successfully created new user: ID: 1 Do you want to build the static web pages? [yes] ? ENTER |
Import the LOC subjects and sample, press ENTER:
1 | Do you want to import the LOC subjects and sample divisions? [yes] ? ENTER |
Update the apache config files, press ENTER:
1 | Do you want to update the apache config files? (you still need to add the 'Include' line) [yes] ? ENTER |
The repository creation is complete, but additional configuration needs to be added in Apache.
1 2 3 4 5 6 7 8 9 10 11 12 13 14 15 16 17 18 19 20 21 22 23 24 25 26 27 28 29 30 31 32 33 34 35 36 | Wrote /opt/eprints3/cfg/apache.conf Wrote /opt/eprints3/cfg/apache_ssl.conf Wrote /opt/eprints3/cfg/perl_module_isolation.conf Wrote /opt/eprints3/cfg/perl_module_isolation_vhost.conf Wrote /opt/eprints3/cfg/apache/repo.conf Wrote /opt/eprints3/cfg/apache_ssl/repo.conf Add the following line to your apache configuration: Include /opt/eprints3/cfg/apache.conf You must restart apache for any changes to take effect! -------------------------------------------------------------------------- That seemed to more or less work ... -------------------------------------------------------------------------- Now make any required changes to the cfg files. Note that changing the metadata configuration may require the database tables to be regenerated. epadmin erase_eprints will regenerate the eprints and documents tables only. erase_data will regenerate everything. (nb. these also do erase the contents of the tables, and any uploaded files). Make sure that your main apache config file contains the line: Include /opt/eprints3/cfg/apache.conf Then stop and start your webserver: Often: /etc/rc.d/init.d/httpd stop /etc/rc.d/init.d/httpd start (or maybe /usr/local/apache/bin/apachectl graceful) And then try connecting to your repository. -------------------------------------------------------------------------- |
Step 6: Configure Apache
Switch from the eprints user to the root user:
1 | exit |
Adding ServerName Public_IP_Address to the default virtual host configuration:
1 2 | ip=$(dig +short myip.opendns.com @resolver1.opendns.com -4) sed -i "s/#ServerName www.example.com/ServerName ${ip}/g" /etc/apache2/sites-available/000-default.conf |
Adding the generated eprints configuration to apache.conf:
1 | echo "Include /opt/eprints3/cfg/apache.conf" >> /etc/apache2/apache2.conf |
Restart Apache:
1 | systemctl restart apache2 |
Check the status of the UFW firewall:
1 2 3 4 5 6 7 | ufw status Status: active To Action From -- ------ ---- 22/tcp ALLOW Anywhere 22/tcp (v6) ALLOW Anywhere (v6) |
If UFW is active, allow HTTP and HTTPS ports:
1 2 | ufw allow http ufw allow https |
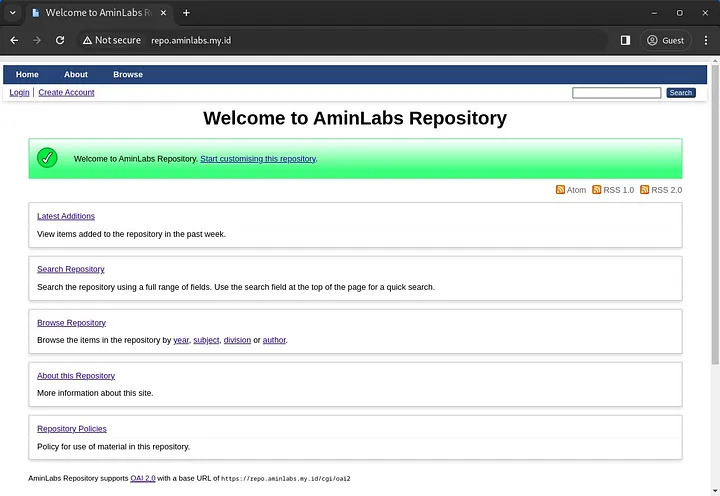
Browse the hostname or subdomain of the repository to test whether EPrints is accessible:

Step 7: Configure HTTPS using Let’s Encrypt SSL
Install certbot:
1 | apt install certbot python3-certbot-apache -y |
Requesting an SSL certificate for the repository subdomain:
1 | certbot --non-interactive -m admin@aminlabs.my.id --agree-tos --no-eff-email --apache certonly -d repo.aminlabs.my.id |
Example message displayed when the SSL certificate request is successful:
1 2 3 4 5 6 7 8 | Requesting a certificate for repo.aminlabs.my.id Successfully received certificate. Certificate is saved at: /etc/letsencrypt/live/repo.aminlabs.my.id/fullchain.pem Key is saved at: /etc/letsencrypt/live/repo.aminlabs.my.id/privkey.pem This certificate expires on 2024-04-02. These files will be updated when the certificate renews. Certbot has set up a scheduled task to automatically renew this certificate in the background. |
Switch to the eprints user:
1 | su -l eprints |
Create a ssl directory inside the archive directory:
1 | mkdir /opt/eprints3/archives/repo/ssl |
Create a securevhost.conf file in the ssl directory:
1 | nano /opt/eprints3/archives/repo/ssl/securevhost.conf |
Insert the following virtual host configuration for HTTPS:
1 2 3 4 5 6 7 8 9 10 11 12 13 14 15 16 17 18 19 20 21 22 23 24 25 26 27 28 29 30 | <VirtualHost *:443> ServerName repo.aminlabs.my.id:443 ErrorLog /var/log/apache2/repo.aminlabs.my.id_error.log TransferLog /var/log/apache2/repo.aminlabs.my.id_access.log LogLevel warn SSLEngine on SSLProtocol all -SSLv2 -SSLv3 -TLSv1 -TLSv1.1 SSLHonorCipherOrder on SSLCipherSuite ECDHE-ECDSA-AES256-GCM-SHA384:ECDHE-RSA-AES256-GCM-SHA384:ECDHE-ECDSA-CHACHA20-POLY1305:ECDHE-RSA-CHACHA20-POLY1305:ECDHE-ECDSA-AES128-GCM-SHA256:ECDHE-RSA-AES128-GCM-SHA256:ECDHE-ECDSA-AES256-SHA384:ECDHE-RSA-AES256-SHA384:ECDHE-ECDSA-AES128-SHA256:ECDHE-RSA-AES128-SHA256 SSLCertificateFile /etc/letsencrypt/live/repo.aminlabs.my.id/fullchain.pem SSLCertificateKeyFile /etc/letsencrypt/live/repo.aminlabs.my.id/privkey.pem SSLCertificateChainFile /etc/letsencrypt/live/repo.aminlabs.my.id/chain.pem SetEnvIf User-Agent ".*MSIE.*" \ nokeepalive ssl-unclean-shutdown \ downgrade-1.0 force-response-1.0 CustomLog /var/log/apache2/repo.aminlabs.my.id_access.log \ "%t %h %{SSL_PROTOCOL}x %{SSL_CIPHER}x \"%r\" %b" Include /opt/eprints3/cfg/apache_ssl/repo.conf PerlTransHandler +EPrints::Apache::Rewrite </VirtualHost> |
Regenerate the Apache configuration for EPrints:
1 | /opt/eprints3/bin/generate_apacheconf --system --replace |
Example message displayed when Apache configuration regeneration is successful:
1 2 3 4 5 6 7 8 | Wrote /opt/eprints3/cfg/apache.conf Wrote /opt/eprints3/cfg/apache_ssl.conf Wrote /opt/eprints3/cfg/perl_module_isolation.conf Wrote /opt/eprints3/cfg/perl_module_isolation_vhost.conf Wrote /opt/eprints3/cfg/apache/repo.conf Wrote /opt/eprints3/cfg/apache_ssl/repo.conf You must restart apache for any changes to take effect! |
Switch from the eprints user to the root user:
1 | exit |
Adding the eprints configuration for HTTPS securevhost.conf to apache.conf:
1 | echo "Include /opt/eprints3/archives/repo/ssl/securevhost.conf" >> /etc/apache2/apache2.conf |
Enable SSL module and restart Apache:
1 2 | a2enmod ssl systemctl restart apache2 |
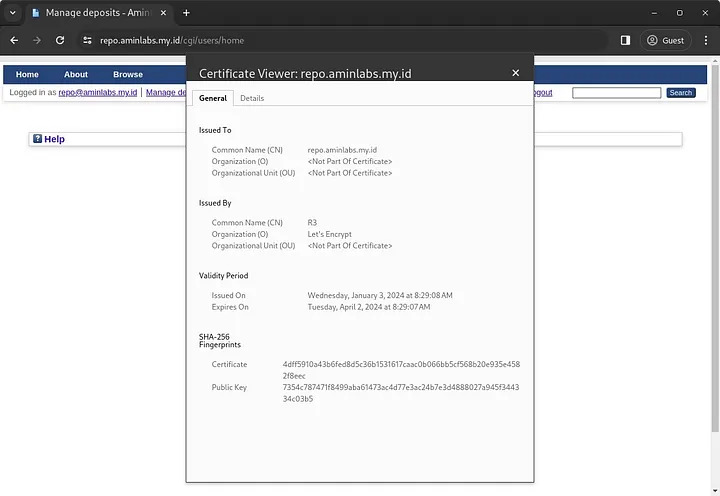
Browse the hostname or subdomain of the repository to test the results of the HTTPS configuration to see if it is accessible. Also, perform login testing:

Congratulations! We have successfully installed EPrints 3.4 on Ubuntu 22.04 LTS using the source code from GitHub, configured a subdomain, and secured it with Let’s Encrypt SSL. We can now begin utilizing EPrints as an institutional repository.
If you found this article helpful and would like to support my work, consider making a donation through PayPal. Your support helps me continue creating useful content and tutorials. Thank you!
Donate via PayPal: https://paypal.me/musaamin

