Cara Install LEMP Stack (Nginx MariaDB PHP) di CentOS 7

Sebelumnya saya sudah pernah menulis tutorial cara install Nginx PHP di Ubuntu. Nah kali ini LEMP Stack (Nginx MariaDB PHP) berjalan di distro Linux CentOS 7.
Web Server Nginx
Install Nginx
1 | # yum install nginx -y |
Cek status Nginx
1 2 3 4 5 6 7 8 9 10 11 | [root@centos ~]# systemctl status nginx ● nginx.service - The nginx HTTP and reverse proxy server Loaded: loaded (/usr/lib/systemd/system/nginx.service; disabled; vendor preset: disabled) Active: active (running) since Kam 2017-11-30 07:35:42 WITA; 2s ago Process: 2272 ExecStart=/usr/sbin/nginx (code=exited, status=0/SUCCESS) Process: 2270 ExecStartPre=/usr/sbin/nginx -t (code=exited, status=0/SUCCESS) Process: 2268 ExecStartPre=/usr/bin/rm -f /run/nginx.pid (code=exited, status=0/SUCCESS) Main PID: 2275 (nginx) CGroup: /system.slice/nginx.service ├─2275 nginx: master process /usr/sbin/nginx └─2276 nginx: worker process |
Jika belum active (running), jalankan service Nginx
1 | # systemctl start nginx |
Lakukan pengujian dengan mengakses alamat IP server di browser

Database MariaDB
Tambahkan repository MariaDB
1 | # nano /etc/yum.repos.d/MariaDB.repo |
Isinya
1 2 3 4 5 | [mariadb] name = MariaDB baseurl = http://yum.mariadb.org/10.1/centos7-amd64 gpgkey=https://yum.mariadb.org/RPM-GPG-KEY-MariaDB gpgcheck=1 |
Install MariaDB
1 2 | # yum update # yum install MariaDB-server MariaDB-client -y |
Jalankan service MariaDB
1 2 3 | # systemctl start mariadb # systemctl enable mariadb # systemctl status mariadb |
Status MariaDB
1 2 3 4 5 6 7 8 9 10 | [root@centos ~]# systemctl status mariadb ● mariadb.service - MariaDB database server Loaded: loaded (/usr/lib/systemd/system/mariadb.service; enabled; vendor preset: disabled) Drop-In: /etc/systemd/system/mariadb.service.d └─migrated-from-my.cnf-settings.conf Active: active (running) since Kam 2017-11-30 07:27:16 WITA; 15min ago Main PID: 1840 (mysqld) Status: "Taking your SQL requests now..." CGroup: /system.slice/mariadb.service └─1840 /usr/sbin/mysqld |
Amankan instalasi MariaDB
1 | # mysql_secure_installation |
Pertanyaan dan konfirmasi
1 2 3 4 5 6 | Enter current password for root (enter for none): enter Change the root password? [Y/n] y Remove anonymous users? [Y/n] y Disallow root login remotely? [Y/n] y Remove test database and access to it? [Y/n] y Reload privilege tables now? [Y/n] y |
Uji login akun root MariaDB
1 | # mysql -u root -p |
Hasilnya
1 2 3 4 5 6 7 8 9 10 11 12 13 14 15 16 17 18 19 20 21 | [root@centos ~]# mysql -u root -p Enter password: Welcome to the MariaDB monitor. Commands end with ; or \g. Your MariaDB connection id is 3 Server version: 10.1.22-MariaDB MariaDB Server Copyright (c) 2000, 2016, Oracle, MariaDB Corporation Ab and others. Type 'help;' or '\h' for help. Type '\c' to clear the current input statement. MariaDB [(none)]> SHOW DATABASES; +--------------------+ | Database | +--------------------+ | information_schema | | mysql | | performance_schema | +--------------------+ 3 rows in set (0.05 sec) MariaDB [(none)]> |
PHP Engine
Install PHP
1 | # yum install php php-common php-fpm php-mysql -y |
Edit php.ini, cari cgi.fix_pathinfo isi dengan 0 dan lepas tanda ;
1 | # nano /etc/php.ini |
Edit www.conf
1 | # nano /etc/php-fpm.d/www.conf |
Cari baris listen = 127.0.0.1:9000 ubah nilainya menjadi /run/php-fpm/php-fpm.sock
1 | listen = /run/php-fpm/php-fpm.sock |
Cari listen.owner dan listen.group isi dengan nginx dan lepas tanda ;
1 2 | listen.owner = nginx listen.group = nginx |
Cari bagian Unix user/group of processes, ubah nilai user dan group menjadi nginx
1 2 | user = nginx group = nginx |
Restart service php-fpm dan cek statusnya
1 2 | # systemctl restart php-fpm # systemctl status php-fpm |
Hasilnya
1 2 3 4 5 6 7 8 9 10 11 12 13 | [root@centos ~]# systemctl status php-fpm ● php-fpm.service - The PHP FastCGI Process Manager Loaded: loaded (/usr/lib/systemd/system/php-fpm.service; disabled; vendor preset: disabled) Active: active (running) since Kam 2017-11-30 07:57:32 WITA; 4s ago Main PID: 2394 (php-fpm) Status: "Ready to handle connections" CGroup: /system.slice/php-fpm.service ├─2394 php-fpm: master process (/etc/php-fpm.conf) ├─2395 php-fpm: pool www ├─2396 php-fpm: pool www ├─2397 php-fpm: pool www ├─2398 php-fpm: pool www └─2399 php-fpm: pool www |
Konfigurasi Nginx
Konfigurasikan Nginx agar dapat mengeksekusi PHP dengan menghubungkannya dengan /run/php-fpm/php-fpm.sock
1 | nano /etc/nginx/default.d/default.conf |
Isinya
1 2 3 4 5 6 7 8 9 10 | index index.php index.html index.htm; server_name 192.168.56.70; # pass the PHP scripts to FastCGI server listening on the php-fpm socket location ~ \.php$ { try_files $uri =404; fastcgi_pass unix:/run/php-fpm/php-fpm.sock; fastcgi_index index.php; fastcgi_param SCRIPT_FILENAME $document_root$fastcgi_script_name; include fastcgi_params; } |
Restart nginx
1 | # systemctl restart nginx |
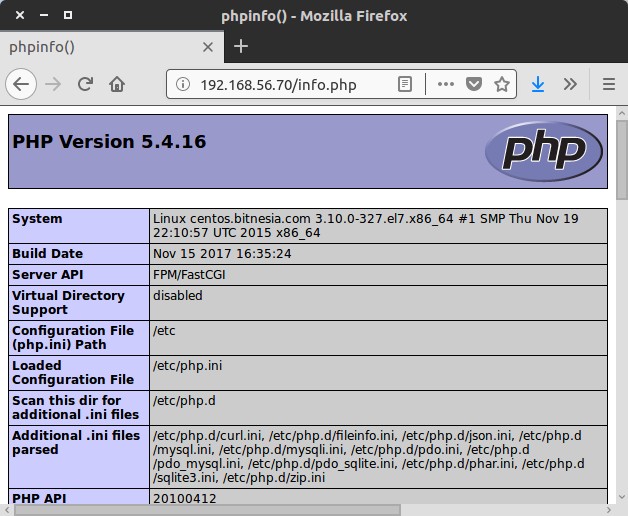
Buat file PHP yang berisi script untuk menampilan info PHP
1 | # nano /usr/share/nginx/html/info.php |
Isinya
1 | <?php phpinfo(); ?> |
Lalu akses http://IP_SERVER/info.php

selamat mencoba 🙂

