Cara Install SQL Server di CentOS 8

SQL Server adalah sebuah relational database management system (RDBMS) yang dikembangkan oleh Microsoft. Sejak tahun 2017, Microsoft telah merilis SQL Server untuk distribusi Linux Red Hat, SUSE, Ubuntu, dan Docker. Di tutorial ini kita akan menginstalasi SQL Server di atas CentOS 8.
System requirements
SQL Server memiliki persyaratan sistem berikut untuk Linux:
- RAM 2GB
- File System XFS/EXT4
- Disk Space 6GB
- CPU speed 2GHz
- CPU core 2 cores
- CPU type x64
Install SQL Server 2019
SQL Server 2019 membutuhkan python2, sementara di CentOS 8 sudah tidak tersedia python2 secara default.
Install python2 dan compat-openssl10.
1 | sudo dnf install python2 compat-openssl10 -y |
Konfigurasi python2 sebagai default interpreter.
1 | sudo alternatives --config python |
Masukkan 2 untuk python2.
1 2 3 4 5 6 7 8 | There are 2 programs which provide 'python'. Selection Command ----------------------------------------------- *+ 1 /usr/libexec/no-python 2 /usr/bin/python2 Enter to keep the current selection[+], or type selection number: 2 |
Download SQL Server 2019 repository configuration file.
1 | sudo curl -o /etc/yum.repos.d/mssql-server.repo https://packages.microsoft.com/config/rhel/8/mssql-server-2019.repo |
Install SQL Server.
1 | sudo dnf install mssql-server -y |
Jalankan myssql-conf setup untuk memberi password kepada akun SA dan memilih edisi SQL Server.
1 | sudo /opt/mssql/bin/mssql-conf setup |
Memilih edisi SQL Server, saya memilih 2) Developer.
1 2 3 4 5 6 7 8 9 10 11 12 13 14 15 16 17 18 19 | Choose an edition of SQL Server: 1) Evaluation (free, no production use rights, 180-day limit) 2) Developer (free, no production use rights) 3) Express (free) 4) Web (PAID) 5) Standard (PAID) 6) Enterprise (PAID) - CPU Core utilization restricted to 20 physical/40 hyperthreaded 7) Enterprise Core (PAID) - CPU Core utilization up to Operating System Maximum 8) I bought a license through a retail sales channel and have a product key to enter. Details about editions can be found at https://go.microsoft.com/fwlink/?LinkId=2109348&clcid=0x409 Use of PAID editions of this software requires separate licensing through a Microsoft Volume Licensing program. By choosing a PAID edition, you are verifying that you have the appropriate number of licenses in place to install and run this software. Enter your edition(1-8): 2 |
Menyetujui lisensi.
1 2 3 4 5 6 7 8 | The license terms for this product can be found in /usr/share/doc/mssql-server or downloaded from: https://go.microsoft.com/fwlink/?LinkId=2104294&clcid=0x409 The privacy statement can be viewed at: https://go.microsoft.com/fwlink/?LinkId=853010&clcid=0x409 Do you accept the license terms? [Yes/No]:Yes |
Memberi password untuk akun system administrator (SA) SQL Server. Password minimal 8 karakter, berisi huruf besar, huruf kecil, angka, dan simbol.
1 | Enter the SQL Server system administrator password: |
Memeriksa status mssql-server service.
1 | sudo systemctl status mssql-server |
Agar bisa remote connection, buka SQL Server port di FirewallD.
1 2 | sudo firewall-cmd --zone=public --add-port=1433/tcp --permanent sudo firewall-cmd --reload |
Install SQL Server command-line tools
Install SQL Server command-line tools, sqlcmd dan bcp.
Download repository configuration file.
1 | sudo curl -o /etc/yum.repos.d/msprod.repo https://packages.microsoft.com/config/rhel/8/prod.repo |
Install mssql-tools.
1 | sudo yum install -y mssql-tools unixODBC-devel -y |
Tambahkan /opt/mssql-tools/bin/ ke dalam PATH environment variable.
1 2 3 | echo 'export PATH="$PATH:/opt/mssql-tools/bin"' >> ~/.bash_profile echo 'export PATH="$PATH:/opt/mssql-tools/bin"' >> ~/.bashrc source ~/.bashrc |
Pengujian
Pengujian dilakukan dengan cara login ke SQL Server, membuat database, dan memasukkan data.
Login ke SQL Server
Login ke SQL Server dengan menggunakan sqlcmd. Masukkan password system administrator yang telah dibuat.
1 | sqlcmd -S localhost -U SA |
Membuat Database
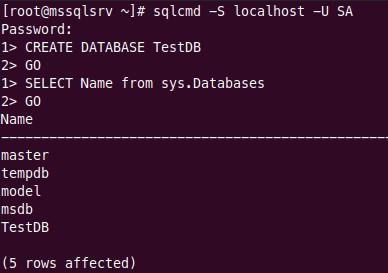
Membuat database TestDB.
1 | CREATE DATABASE TestDB |
Perintah di atas belum dieksekusi, ketik GO untuk mengeksekusi perintah sebelumnya.
1 | GO |
Menampilkan semua database yang ada di server.
1 2 | SELECT Name from sys.Databases GO |

Memasukkan Data
Selanjutnya membuat tabel dan memasukkan dua baris data.
Beralih ke TestDB.
1 | USE TestDB |
Membuat tabel dengan nama Inventory.
1 | CREATE TABLE Inventory (id INT, name NVARCHAR(50), quantity INT) |
Memasukkan data ke dalam tabel.
1 | INSERT INTO Inventory VALUES (1, 'banana', 150); INSERT INTO Inventory VALUES (2, 'orange', 154); |
Terakhir ketik GO untuk mengeksekusi perintah sebelumnya.
1 | GO |

Memilih Data
Memilih dan menampilkan data dari tabel Inventory.
1 2 | SELECT * FROM Inventory WHERE quantity > 152 GO |

Keluar dari sqlcmd
Untuk keluar dari sqlcmd ketik QUIT.
1 | QUIT |
Selamat mencoba 🙂

