Cara Install EPrints 3.4 untuk Digital Repository di Ubuntu 22.04

EPrints adalah perangkat lunak repositori institusional sumber terbuka yang dirancang khusus untuk mendukung manajemen dan distribusi koleksi digital di lingkungan akademis. Dikembangkan oleh Universitas Southampton pada tahun 2000, EPrints telah menjadi salah satu solusi repositori yang paling terkenal dan banyak digunakan di seluruh dunia.
EPrints bertujuan untuk memudahkan institusi akademis, perpustakaan, dan organisasi lain dalam mengelola, menyimpan, dan mendistribusikan hasil intelektual mereka secara digital. Perangkat lunak ini dirancang untuk mendukung akses terbuka, memastikan bahwa informasi ilmiah dapat diakses dan dimanfaatkan oleh masyarakat umum.
Dalam tutorial ini, kita akan belajar cara menginstal EPrints 3.4 dengan spesifikasi berikut:
- Vultr Cloud Server: 1 CPU, 1 GB RAM, 32 GB Storage
- Operating System: Ubuntu 22.04 LTS
- Subdomain: repo.aminlabs.my.id
- SSL: Let’s Encrypt
- Database: MySQL v8.0
- EPrints: EPrints v3.4.5
- Metode instalasi: install dari source yang ada di GitHub
Catatan: Daftar di sini untuk mendapatkan $100 free credit dari Vultr
1. Install Paket
Konek ke server dan lakukan update:
1 2 | apt update apt upgrade -y |
Catatan: Tutorial ini menggunakan user root.
Install semua paket yang dibutuhkan oleh EPrints:
1 2 3 4 5 6 | apt install perl libncurses5 libselinux1 apache2 libapache2-mod-perl2 libxml-libxml-perl \ libunicode-string-perl libterm-readkey-perl libmime-lite-perl libmime-types-perl libdigest-sha-perl \ libdbd-mysql-perl libxml-parser-perl libxml2-dev libxml-twig-perl libarchive-any-perl libjson-perl \ liblwp-protocol-https-perl libtext-unidecode-perl lynx wget ghostscript poppler-utils antiword elinks \ texlive-base texlive-base-bin psutils imagemagick adduser tar gzip unzip libsearch-xapian-perl \ libtex-encode-perl libio-string-perl libdbd-mysql-perl git xpdf python3-html2text make -y |
2. Install MySQL
Install MySQL server dan client:
1 | apt install mysql-server mysql-client -y |
Login ke MySQL:
1 | mysql |
Membuat user eprints di MySQL:
1 2 3 4 | CREATE USER 'eprints'@'localhost' IDENTIFIED by 'changeme'; GRANT ALL PRIVILEGES ON *.* TO 'eprints'@'localhost' WITH GRANT OPTION; FLUSH PRIVILEGES; exit |
3. Membuat User
Membuat user eprints di sistem:
1 | adduser eprints |
Membuka file /etc/apache2/envvars:
1 | nano /etc/apache2/envvars |
Update konfigurasinya agar menggunakan user dan group eprints:
1 2 | export APACHE_RUN_USER=eprints export APACHE_RUN_GROUP=eprints |
Restart Apache:
1 | systemctl restart apache2 |
4. Download Source EPrints
Membuat direktori eprints3 untuk penyimpanan source EPrints:
1 2 3 | mkdir /opt/eprints3 chown eprints:eprints /opt/eprints3 chmod 2775 /opt/eprints3 |
Download source EPrints dari GitHub:
1 2 | su -l eprints git clone https://github.com/eprints/eprints3.4.git /opt/eprints3 |
Gunakan EPrints v3.4.5:
1 2 | cd /opt/eprints3 git checkout tags/v3.4.5 |
5. Membuat Repository
Membuat repository dengan flavour publication:
1 | bin/epadmin create pub |
Masukkan Archive ID:
1 2 3 4 5 6 7 | Create a pub Repository Please select an ID for the repository, which will be used to create a directory and identify the repository. Lower case letters, numbers and underscores, may not start with a number or underscore. examples: "lemurprints", "test3" or "research_archive" Archive ID? repo |
Configure vital settings, tekan ENTER:
1 2 3 4 5 6 7 8 9 | Ok. I've created the initial config files and directory structure. I've also created a "disk0" directory under documents/ if you want your full texts to be stored on a different partition then remove the disk0, and create a symbolic link to the directory you wish to store the full texts in. Additional links may be placed here to be used when the first is full. Configure vital settings? [yes] ? ENTER |
Masukkan hostname untuk repository:
1 2 3 4 5 6 7 8 9 10 11 | Core configuration for repo Please enter the fully qualified hostname of the repository. For a production system we recommend against using the real hostname of the machine. Example: repo.footle.ac.uk Hostname? repo.aminlabs.my.id |
Catatan: Pastikan mengganti dengan subdomain yang digunakan
Webserver port, tekan ENTER:
1 2 3 4 | Please enter the port of the webserver. This is probably 80, but you may wish to run apache on a different port if you are experimenting. Webserver Port [80] ? ENTER |
Alias untuk hostname, tekan ENTER:
1 2 3 4 5 6 7 8 9 10 11 12 13 | Please enter all the aliases which could reach the repository, and indicate if you would like EPrints to write a Redirect Rule to redirect requests to this alias to the correct URL. Some suggestions: aminlabs.example.org aminlabs.example aminlabs repo.aminlabs repo Enter a single hash (#) when you're done. Alias (enter # when done) [#] ? ENTER |
Repository’s base URL, tekan ENTER:
1 2 3 4 | Please enter the path part of the repository's base URL. This should probably be '/'. Path [/] ? ENTER |
Masukan hostname untuk HTTPS:
1 2 3 4 | If you will use https for your user pages (including login) enter the https hostname here, or leave blank when using http only. HTTPS Hostname [] ? repo.aminlabs.my.id |
Secure webserver port, tekan ENTER:
1 2 3 | Please enter the port of your secure (https) server. This is probably 443. Secure Webserver Port [443] ? ENTER |
Masukkan email untuk akun administrator:
1 | Administrator Email? repo@aminlabs.my.id |
Masukkan nama repository:
1 2 3 4 5 6 | Enter the name of the repository in the default language. If you wish to enter other titles for other languages or enter non ascii characters then you may enter something as a placeholder and edit the XML config file which this script generates. Archive Name [Test Repository] ? AminLabs Repository |
Masukkan nama organisasi:
1 2 3 4 5 6 | Enter the name of the organisation in the default language. Again, if you wish to enter other titles for other languages or enter non ascii characters then you may enter something as a placeholder and edit the XML config file which this script generates. Organisation Name [Organisation of Test] ? AminLabs |
Writer the core settings, tekan ENTER:
1 | Write these core settings? [yes] ? ENTER |
Configure database, tekan ENTER:
1 | Configure database? [yes] ? ENTER |
Database configuration, tekan ENTER:
1 2 3 4 5 6 7 8 9 10 11 | Database Name [repo] ? ENTER MySQL Host [localhost] ? ENTER You probably don't need to set socket and port (unless you do!?). MySQL Port (# for no setting) [#] ? ENTER MySQL Socket (# for no setting) [#] ? ENTER Database User [repo] ? ENTER Database Password [pqpVxhhgg7zdZznR] ? ENTER Database Engine [InnoDB] ? ENTER Write these database settings? [yes] ? ENTER |
Masukkan user MySQL yang sudah dibuat sebelumnya, yaitu eprints:
1 2 3 4 5 6 7 | EPrints can create the database, and grant the correct permissions. Create database "repo" [yes] ? ENTER Create database "repo" [yes] ? Database Superuser Username [root] ? eprints Database Superuser Password? PASSWORD Create database tables? [yes] ? ENTER |
Membuat akun administrator:
1 2 3 4 5 6 7 | Create an initial user? [yes] ? ENTER Creating a new user in repo Enter a username [admin] ? ENTER Select a user type (user|editor|admin) [admin] ? ENTER Enter Password? PASSWORD Email? repo@aminlabs.my.id |
Build the static web pages, tekan ENTER:
1 2 3 | Successfully created new user: ID: 1 Do you want to build the static web pages? [yes] ? ENTER |
Import the LOC subjects and sample, tekan ENTER:
1 | Do you want to import the LOC subjects and sample divisions? [yes] ? ENTER |
Update the apache config files, tekan ENTER:
1 | Do you want to update the apache config files? (you still need to add the 'Include' line) [yes] ? ENTER |
Pembuatan repository telah selesai, tapi harus menambahkan konfigurasi di Apache.
1 2 3 4 5 6 7 8 9 10 11 12 13 14 15 16 17 18 19 20 21 22 23 24 25 26 27 28 29 30 31 32 33 34 35 36 | Wrote /opt/eprints3/cfg/apache.conf Wrote /opt/eprints3/cfg/apache_ssl.conf Wrote /opt/eprints3/cfg/perl_module_isolation.conf Wrote /opt/eprints3/cfg/perl_module_isolation_vhost.conf Wrote /opt/eprints3/cfg/apache/repo.conf Wrote /opt/eprints3/cfg/apache_ssl/repo.conf Add the following line to your apache configuration: Include /opt/eprints3/cfg/apache.conf You must restart apache for any changes to take effect! -------------------------------------------------------------------------- That seemed to more or less work ... -------------------------------------------------------------------------- Now make any required changes to the cfg files. Note that changing the metadata configuration may require the database tables to be regenerated. epadmin erase_eprints will regenerate the eprints and documents tables only. erase_data will regenerate everything. (nb. these also do erase the contents of the tables, and any uploaded files). Make sure that your main apache config file contains the line: Include /opt/eprints3/cfg/apache.conf Then stop and start your webserver: Often: /etc/rc.d/init.d/httpd stop /etc/rc.d/init.d/httpd start (or maybe /usr/local/apache/bin/apachectl graceful) And then try connecting to your repository. -------------------------------------------------------------------------- |
6. Konfigurasi Apache
Beralih dari user eprints ke user root:
1 | exit |
Menambahkan ServerName Public_IP_Address ke dalam file konfigurasi default virtual host:
1 2 | ip=$(dig +short myip.opendns.com @resolver1.opendns.com -4) sed -i "s/#ServerName www.example.com/ServerName ${ip}/g" /etc/apache2/sites-available/000-default.conf |
Menambahkan konfigurasi eprints ke dalam apache.conf:
1 | echo "Include /opt/eprints3/cfg/apache.conf" >> /etc/apache2/apache2.conf |
Restart Apache:
1 | systemctl restart apache2 |
Memeriksa apakah status UFW firewall sedang aktif:
1 2 3 4 5 6 7 | ufw status Status: active To Action From -- ------ ---- 22/tcp ALLOW Anywhere 22/tcp (v6) ALLOW Anywhere (v6) |
Jika UFW aktif, ijinkan trafik ke port HTTP dan HTTPS:
1 2 | ufw allow http ufw allow https |
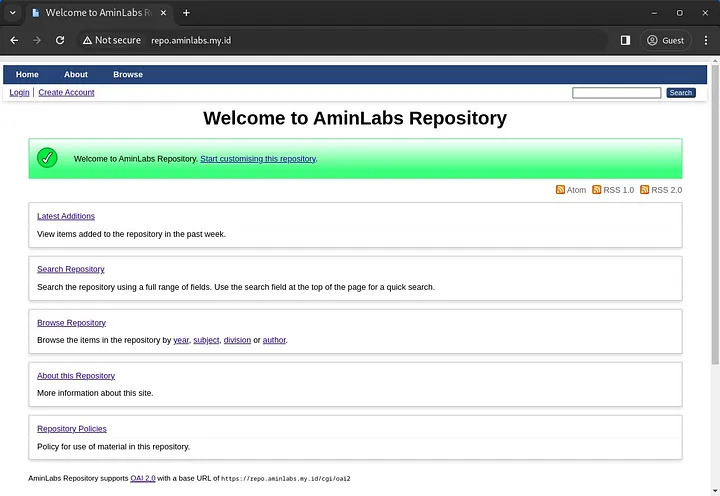
Browse hostname atau subdomain untuk menguji apakah EPrints sudah dapat diakses:

7. Konfigurasi HTTPS
Install certbot:
1 | apt install certbot python3-certbot-apache -y |
Request sertifikat SSL untuk subdomain:
1 | certbot --non-interactive -m admin@aminlabs.my.id --agree-tos --no-eff-email --apache certonly -d repo.aminlabs.my.id |
Pesan yang ditampilkan jika request sertifikat SSL berhasil:
1 2 3 4 5 6 7 8 | Requesting a certificate for repo.aminlabs.my.id Successfully received certificate. Certificate is saved at: /etc/letsencrypt/live/repo.aminlabs.my.id/fullchain.pem Key is saved at: /etc/letsencrypt/live/repo.aminlabs.my.id/privkey.pem This certificate expires on 2024-04-02. These files will be updated when the certificate renews. Certbot has set up a scheduled task to automatically renew this certificate in the background. |
Beralih ke user eprints:
1 | su -l eprints |
Membuat direktori ssl di dalam direktori archive:
1 | mkdir /opt/eprints3/archives/repo/ssl |
Membuat file securevhost.conf di dalam direktori ssl:
1 | nano /opt/eprints3/archives/repo/ssl/securevhost.conf |
Masukkan konfigurasi virtual host berikut untuk protokol HTTPS:
1 2 3 4 5 6 7 8 9 10 11 12 13 14 15 16 17 18 19 20 21 22 23 24 25 26 27 28 29 30 | <VirtualHost *:443> ServerName repo.aminlabs.my.id:443 ErrorLog /var/log/apache2/repo.aminlabs.my.id_error.log TransferLog /var/log/apache2/repo.aminlabs.my.id_access.log LogLevel warn SSLEngine on SSLProtocol all -SSLv2 -SSLv3 -TLSv1 -TLSv1.1 SSLHonorCipherOrder on SSLCipherSuite ECDHE-ECDSA-AES256-GCM-SHA384:ECDHE-RSA-AES256-GCM-SHA384:ECDHE-ECDSA-CHACHA20-POLY1305:ECDHE-RSA-CHACHA20-POLY1305:ECDHE-ECDSA-AES128-GCM-SHA256:ECDHE-RSA-AES128-GCM-SHA256:ECDHE-ECDSA-AES256-SHA384:ECDHE-RSA-AES256-SHA384:ECDHE-ECDSA-AES128-SHA256:ECDHE-RSA-AES128-SHA256 SSLCertificateFile /etc/letsencrypt/live/repo.aminlabs.my.id/fullchain.pem SSLCertificateKeyFile /etc/letsencrypt/live/repo.aminlabs.my.id/privkey.pem SSLCertificateChainFile /etc/letsencrypt/live/repo.aminlabs.my.id/chain.pem SetEnvIf User-Agent ".*MSIE.*" \ nokeepalive ssl-unclean-shutdown \ downgrade-1.0 force-response-1.0 CustomLog /var/log/apache2/repo.aminlabs.my.id_access.log \ "%t %h %{SSL_PROTOCOL}x %{SSL_CIPHER}x \"%r\" %b" Include /opt/eprints3/cfg/apache_ssl/repo.conf PerlTransHandler +EPrints::Apache::Rewrite </VirtualHost> |
Generate ulang konfigurasi Apache untuk EPrints:
1 | /opt/eprints3/bin/generate_apacheconf --system --replace |
Pesan yang ditampilkan jika generate ulang konfigurasi Apache berhasil:
1 2 3 4 5 6 7 8 | Wrote /opt/eprints3/cfg/apache.conf Wrote /opt/eprints3/cfg/apache_ssl.conf Wrote /opt/eprints3/cfg/perl_module_isolation.conf Wrote /opt/eprints3/cfg/perl_module_isolation_vhost.conf Wrote /opt/eprints3/cfg/apache/repo.conf Wrote /opt/eprints3/cfg/apache_ssl/repo.conf You must restart apache for any changes to take effect! |
Beralih ke user root:
1 | exit |
Menambahkan konfigurasi virtual host HTTPS securevhost.conf ke dalam file apache.conf:
1 | echo "Include /opt/eprints3/archives/repo/ssl/securevhost.conf" >> /etc/apache2/apache2.conf |
Mengaktifkan modul SSL dan restart Apache:
1 2 | a2enmod ssl systemctl restart apache2 |
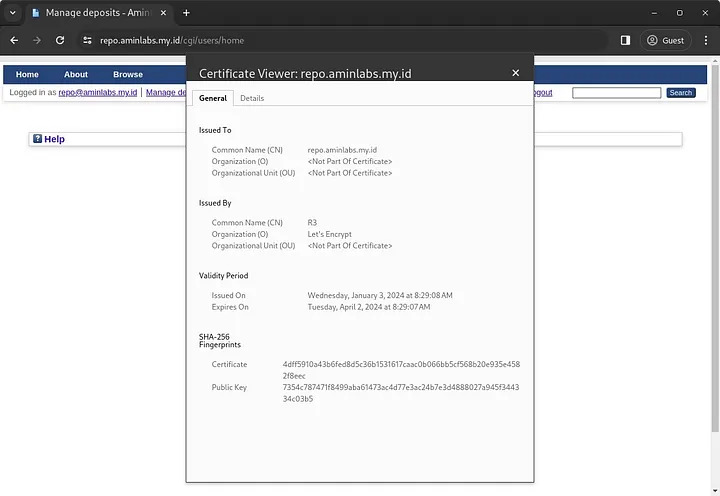
Browse subdomain untuk menguji apakah konfigurasi HTTPS sudah berhasil, dapat diakses. Selain itu, lakukan juga pengujian login:

Selamat! Kita telah berhasil menginstal EPrints 3.4 pada Ubuntu 22.04 LTS menggunakan source dari GitHub, mengonfigurasi subdomain, dan mengamankannya dengan Let’s Encrypt SSL. Sekarang kita dapat mulai menggunakan EPrints sebagai repository.
Selamat mencoba 🙂


Mohon petunjuk juragan, bagaimana jika saya install eprints nya di debian ?
itupun dalam kondisi database ada di server lain dan adanya memang mariadb.
sedangkan dependensi eprints di semua tutorial mintanya mysql
pada database configuration, masukkan IP server database di MySQL Host
bang sy install nya ikuti tutorial ini..
https://musaamin.web.id/cara-install-eprints34-di-ubuntu2004/
untuk penambahan https apakah bisa pakai tutorial diatas yaa ? soalnya sy lihat ada sedikit perbedaan direktori pada saat pengistalan..
terima kasih bang
ganti aja path file SSL Let’s Encrypt dengan file SSL yang digunakan.
Mohon petunjuk bang, ikutin tutorial selalu mentok ketika buat database masukin password superuser, padahal sudah sama password dengan yang dibuat di mysql dan juga sudah diupdate juga policynya jadi =LOW
$ mysql -u root -p
mysql> SET GLOBAL validate_password_policy=LOW;
masih tetap error ini juga
Your password does not satisfy the current policy requ irements at /opt/eprints3/perl_lib/EPrints/Database/mysql.pm line 162, l ine 24.
biasanya masih keliru di superuser database
saya gagal mendapatkan sertifikat ssl, solusinya bagaimana ya
apa pesan errornya?
mohon bantuannya pak
saat saya tekan nano /etc/apache2/envvars isinya kosong… bagaimana cara mengatasinya?
pastikan apache2 sudah terinstal,
sudo apt install apache2.