Cara Install Nextcloud dengan Nginx di Ubuntu 24.04
Penyimpanan cloud telah menjadi kebutuhan penting bagi banyak orang. Layanan seperti Dropbox dan Google Drive menawarkan kemudahan akses file dari mana saja, namun privasi dan kontrol data seringkali menjadi kekhawatiran utama. Nextcloud hadir sebagai solusi open-source yang memungkinkan kita membangun cloud storage sendiri, memberikan kontrol penuh atas data dan privasi yang terjamin. Selain itu, Nextcloud menawarkan berbagai fitur tambahan melalui aplikasi-aplikasi yang dapat diinstal sesuai kebutuhan. Pada tutorial kali ini, kita akan belajar bagaimana cara install Nextcloud dengan Nginx di Ubuntu 24.04.
Tutorial Environment
Pada tutorial ini menggunakan:
- VPS: Vultr 1 CPU 1 GB RAM
- OS: Ubuntu 24.04
- Web server: Nginx
- PHP: PHP v8.3
- Database: MariaDB v10.11
- Subdomain: nextcloud.aminlabs.my.id
- SSL: Let’s Encrypt
- Nextcloud: Nextcloud v29
Catatan:
- System requirements Nextcloud baca di docs.nextcloud.com
- Daftar di sini untuk mendapatkan $100 free credit dari Vultr
Install Nextcloud
Tahapan install Nextcloud terbagi menjadi 6 tahapan, yaitu install database MariaDB, install PHP, install Nginx, install SSL, dan install Nextcloud.
1. Install MariaDB
Update dan upgrade system Ubuntu:
1 2 | sudo apt update sudo apt upgrade -y |
Install MariaDB database:
1 | sudo apt install mariadb-server -y |
Login ke MariaDB:
1 | sudo mariadb -u root |
Membuat database untuk Nextcloud:
1 2 3 4 5 | CREATE DATABASE nextcloud; CREATE USER 'nextcloud'@'localhost' IDENTIFIED BY 'rahasia'; GRANT ALL PRIVILEGES ON nextcloud.* TO 'nextcloud'@'localhost'; FLUSH PRIVILEGES; exit |
2. Install PHP
Install PHP dan extension yang dibutuhkan oleh Nextcloud:
1 | sudo apt install php8.3 php8.3-common php8.3-cli php8.3-fpm php8.3-gd php8.3-xml php8.3-mbstring php8.3-mysql php8.3-curl php8.3-zip zlib1g-dev -y |
Membuka file konfigurasi php.ini:
1 | sudo nano /etc/php/8.3/fpm/php.ini |
Mengubah nilai memory_limit menjadi 512M:
1 | memory_limit = 512M |
Restart server PHP-FPM:
1 | sudo systemctl restart php8.3-fpm |
3. Install Nginx
Install Nginx web server:
1 | sudo apt install nginx -y |
Membuat file konfigurasi Nginx server block untuk subdomain nextcloud.aminlabs.my.id:
1 | sudo nano /etc/nginx/sites-available/nextcloud.aminlabs.my.id.conf |
Masukkan konfigurasinya:
1 2 3 4 | server { listen 80; server_name nextcloud.aminlabs.my.id; } |
Mengaktifkan konfigurasi Nginx server block:
1 | sudo ln -s /etc/nginx/sites-available/nextcloud.aminlabs.my.id.conf /etc/nginx/sites-enabled |
Restart service nginx:
1 | sudo systemctl restart nginx |
Membuka port 80 dan 443 jika firewall UFW aktif:
1 2 | sudo ufw allow 80 sudo ufw allow 443 |
4. Install SSL
Install Certbot untuk Nginx:
1 | sudo apt install certbot python3-certbot-nginx -y |
Request SSL untuk subdomain nextcloud.aminlabs.my.id:
1 2 3 4 5 6 7 | sudo certbot --non-interactive \ -m admin@aminlabs.my.id \ --agree-tos \ --no-eff-email \ --nginx \ -d nextcloud.aminlabs.my.id \ --redirect |
5. Konfigurasi Nginx untuk Nextcloud
Membuka file konfigurasi Nginx server block yang telah dibuat sebelumnya:
1 | sudo nano /etc/nginx/sites-available/nextcloud.aminlabs.my.id.conf |
Mengubah isi konfigurasi untuk reverse proxy ke PHP-FPM dan konfigurasi khusus untuk Nextcloud:
1 2 3 4 5 6 7 8 9 10 11 12 13 14 15 16 17 18 19 20 21 22 23 24 25 26 27 28 29 30 31 32 33 34 35 36 37 38 39 40 41 42 43 44 45 46 47 48 49 50 51 52 53 54 55 56 57 58 59 60 61 62 63 64 65 66 67 68 69 70 71 72 73 74 75 76 77 78 79 80 81 82 83 84 85 86 87 88 89 90 91 92 93 94 95 96 97 98 99 100 101 102 103 104 105 106 107 108 109 110 111 112 113 114 115 116 117 118 119 120 121 122 123 124 125 126 127 128 129 130 131 132 133 134 135 136 137 138 | upstream php-handler { server unix:/run/php/php8.3-fpm.sock; } map $arg_v $asset_immutable { "" ""; default ", immutable"; } server { listen 80; listen [::]:80; server_name nextcloud.aminlabs.my.id; server_tokens off; return 301 https://$server_name$request_uri; } server { listen 443 ssl http2; listen [::]:443 ssl http2; server_name nextcloud.aminlabs.my.id; server_tokens off; root /var/www/nextcloud.aminlabs.my.id/nextcloud; ssl_certificate /etc/letsencrypt/live/nextcloud.aminlabs.my.id/fullchain.pem; ssl_certificate_key /etc/letsencrypt/live/nextcloud.aminlabs.my.id/privkey.pem; include /etc/letsencrypt/options-ssl-nginx.conf; ssl_dhparam /etc/letsencrypt/ssl-dhparams.pem; client_max_body_size 512M; client_body_timeout 300s; client_body_buffer_size 512k; fastcgi_buffers 64 4K; fastcgi_hide_header X-Powered-By; gzip on; gzip_vary on; gzip_comp_level 4; gzip_min_length 256; gzip_proxied expired no-cache no-store private no_last_modified no_etag auth; gzip_types application/atom+xml text/javascript application/javascript application/json application/ld+json application/manifest+json application/rss+xml application/vnd.geo+json application/vnd.ms-fontobject application/wasm application/x-font-ttf application/x-web-app-manifest+json application/xhtml+xml application/xml font/opentype image/bmp image/svg+xml image/x-icon text/cache-manifest text/css text/plain text/vcard text/vnd.rim.location.xloc text/vtt text/x-component text/x-cross-domain-policy; add_header Referrer-Policy "no-referrer" always; add_header X-Content-Type-Options "nosniff" always; add_header X-Frame-Options "SAMEORIGIN" always; add_header X-Permitted-Cross-Domain-Policies "none" always; add_header X-Robots-Tag "noindex, nofollow" always; add_header X-XSS-Protection "1; mode=block" always; include mime.types; types { text/javascript mjs; } index index.php /index.php$request_uri; location = / { if ( $http_user_agent ~ ^DavClnt ) { return 302 /remote.php/webdav/$is_args$args; } } location = /robots.txt { allow all; log_not_found off; access_log off; } location ^~ /.well-known { location = /.well-known/carddav { return 301 /remote.php/dav/; } location = /.well-known/caldav { return 301 /remote.php/dav/; } location /.well-known/acme-challenge { try_files $uri $uri/ =404; } location /.well-known/pki-validation { try_files $uri $uri/ =404; } return 301 /index.php$request_uri; } location ~ ^/(?:build|tests|config|lib|3rdparty|templates|data)(?:$|/) { return 404; } location ~ ^/(?:\.|autotest|occ|issue|indie|db_|console) { return 404; } location ~ \.php(?:$|/) { rewrite ^/(?!index|remote|public|cron|core\/ajax\/update|status|ocs\/v[12]|updater\/.+|ocs-provider\/.+|.+\/richdocumentscode(_arm64)?\/proxy) /index.php$request_uri; fastcgi_split_path_info ^(.+?\.php)(/.*)$; set $path_info $fastcgi_path_info; try_files $fastcgi_script_name =404; include fastcgi_params; fastcgi_param SCRIPT_FILENAME $document_root$fastcgi_script_name; fastcgi_param PATH_INFO $path_info; fastcgi_param HTTPS on; fastcgi_param modHeadersAvailable true; fastcgi_param front_controller_active true; fastcgi_pass php-handler; fastcgi_intercept_errors on; fastcgi_request_buffering off; fastcgi_max_temp_file_size 0; } location ~ \.(?:css|js|mjs|svg|gif|png|jpg|ico|wasm|tflite|map|ogg|flac)$ { try_files $uri /index.php$request_uri; add_header Cache-Control "public, max-age=15778463$asset_immutable"; add_header Referrer-Policy "no-referrer" always; add_header X-Content-Type-Options "nosniff" always; add_header X-Frame-Options "SAMEORIGIN" always; add_header X-Permitted-Cross-Domain-Policies "none" always; add_header X-Robots-Tag "noindex, nofollow" always; add_header X-XSS-Protection "1; mode=block" always; access_log off; } location ~ \.woff2?$ { try_files $uri /index.php$request_uri; expires 7d; access_log off; } location /remote { return 301 /remote.php$request_uri; } location / { try_files $uri $uri/ /index.php$request_uri; } access_log /var/log/nginx/nextcloud.aminlabs.my.id_access.log; error_log /var/log/nginx/nextcloud.aminlabs.my.id_error.log; } |
Penjelasan lengkap mengenai konfigurasi di atas baca di docs.nextcloud.com.
Restart service nginx:
1 | sudo systemctl restart nginx |
6. Nextcloud Web Installer
Download Nextcloud web installer terbaru:
1 | wget https://download.nextcloud.com/server/releases/latest.zip -O nextcloud.zip |
Install unzip jika belum tersedia:
1 | sudo apt install unzip -y |
Extract nextcloud.zip ke direktori document root, sesuai konfigurasi di Nginx:
1 | sudo unzip nextcloud.zip -d /var/www/nextcloud.aminlabs.my.id |
Membuat direktori nextcloud-data untuk direktori penyimpanan data Nextcloud:
1 | sudo mkdir /var/www/nextcloud.aminlabs.my.id/nextcloud-data |
Mengubah ownership direktori ke user www-data:
1 | sudo chown -R www-data:www-data /var/www/nextcloud.aminlabs.my.id |
Browse https://nextcloud.aminlabs.my.id. Jika semua konfigurasi sebelumnya benar, ditampilkan hasil seperti pada gambar di bawah ini:
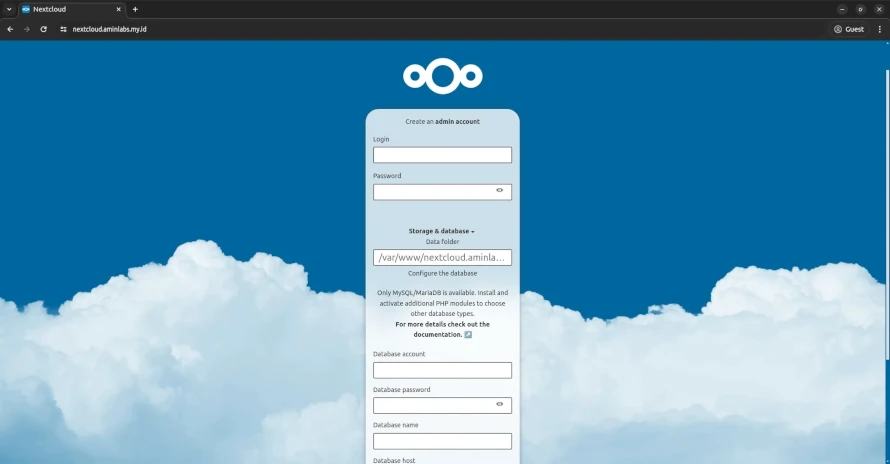
Masukkan:
- Login: username untuk akun admin Nextcloud
- Password: password untuk akun admin Nextcloud
- Data folder: lokasi direktori data,
/var/www/nextcloud.aminlabs.my.id/nextcloud-data - Database account: username database,
nextcloud - Database password: password database,
rahasia - Database name: nama database,
nextcloud
Lalu klik tombol Install.
Jika instalasi selesai dan berhasil, ditampilkan hasil seperti pada gambar di bawah ini:
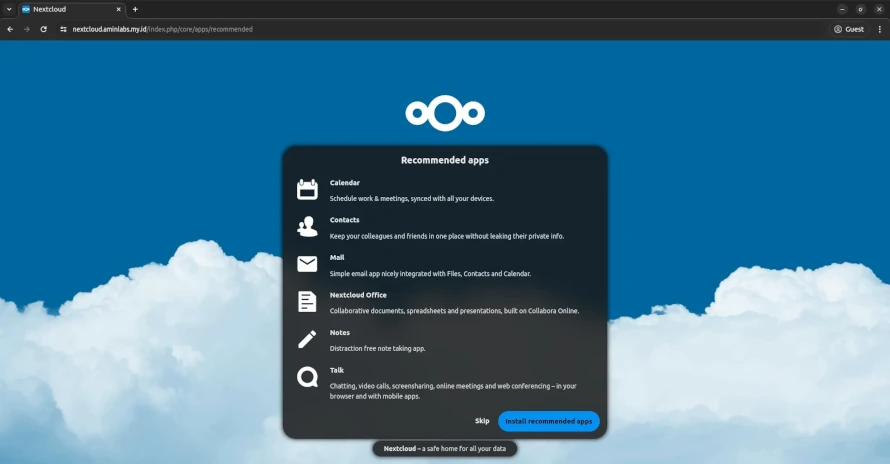
Klik Skip, redirect ke Dashboard.
Sampai di sini, tahapan install untuk Nextcloud telah selesai. Untuk petunjuk administrasi dan penggunaan Nextcloud, silakan ikuti panduan resmi berikut:
Selamat mencoba 🙂
