Cara Konfigurasi Nginx Sebagai Reverse Proxy Apache di Ubuntu 16.04
Reverse Proxy
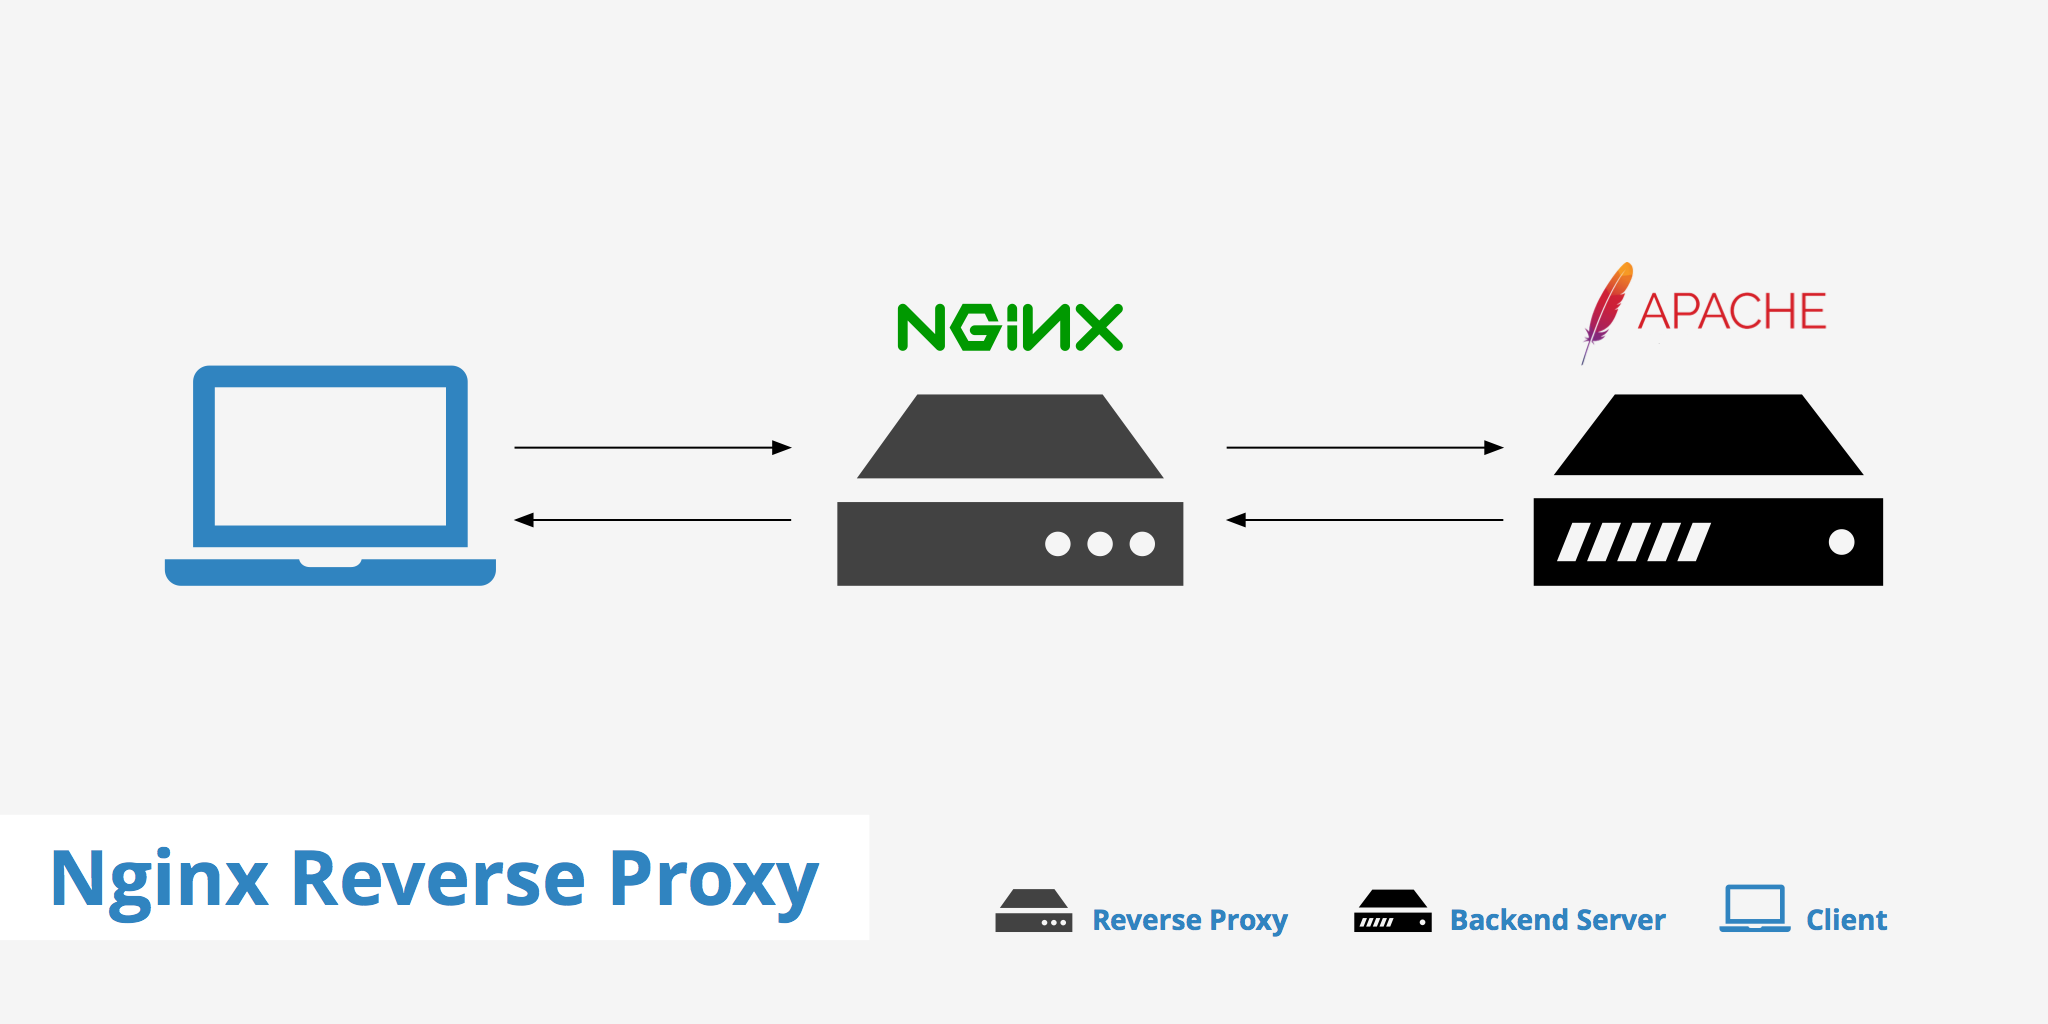
Nginx dan Apache dapat digunakan secara bersamaan di mana Nginx bertindak sebagai reverse proxy yang menerima permintaan dari client dan meneruskannya ke web server lain seperti Apache, kemudian Apache mengirimkan kembali respon yang diminta oleh Nginx untuk dikirimkan ke client. Hal ini dilakukan agar kedua web server ini bisa saling menutupi kekurangan.
Install Apache dan PHP-FPM
Install paket Apache dan PHP-FPM
1 2 | su apt-get install apache2 libapache2-mod-fastcgi php-fpm |
Konfigurasi port Apache.
Ubah Listen 80 menjadi Listen 8080.
1 | nano /etc/apache2/ports.conf |
Edit file 000-default.conf.
Ubah
1 | nano /etc/apache2/sites-available/000-default.conf |
Restart service Apache.
1 | systemctl restart apache2 |
Verfisikasi apakah Apache sudah berjalan di port 8080.
1 | netstat -tlpn |
Hasilnya
1 2 | Proto Recv-Q Send-Q Local Address Foreign Address State PID/Program name tcp6 0 0 :::8080 :::* LISTEN 320/apache2 |
Konfigurasi Apache Menggunakan mod_fastcgi
Jika sebelumnya sudah terinstall LAMP dan menggunakan mod_php, nonaktifkan module ini terlebih dahulu.
1 | a2dismod php7.0 |
Aktifkan mod_action karena dibutuhkan untuk mod_fastcgi.
1 | a2enmod actions |
Edit file fastcgi.conf
1 | nano /etc/apache2/mods-enabled/fastcgi.conf |
Tambahkan baris kode di bawah ini sebelum penutup IfModule.
1 2 3 4 5 6 7 | AddType application/x-httpd-fastphp.php Action application/x-httpd-fastphp /php-fcgi Alias /php-fcgi /usr/lib/cgi-bin/php-fcgi FastCgiExternalServer /usr/lib/cgi-bin/php-fcgi -socket /run/php/php7.0-fpm.sock -pass-header Authorization <Directory /usr/lib/cgi-bin> Require all granted </Directory> |
Uji konfigurasi Apache apakah tidak ada yang salah.
1 | apachectl -t |
Restart service Apache
1 | systemctl restart apache2 |
Pengujian PHP
Buat file info.php di dalam folder /var/www/html.
1 | echo "<?php phpinfo(); ?>" | tee /var/www/html/info.php |
Browsing http://IP_ADDRESS:8080/info.php.
Jika menggunakan PHP-FPM dan Apache hasilnya seperti gambar di bawah ini.


Membuat Virtual Host untuk Apache
Di sini saya membuat 2 virtual host, sysadmin.id dan devops.id.
Membuat file virtual host sysadmin.id
1 | nano /etc/apache2/sites-available/sysadmin.id.conf |
Isinya
1 2 3 4 5 6 7 8 9 10 11 12 13 14 15 16 | <VirtualHost *:8080> ServerName sysadmin.id.id ServerAlias www.sysadmin.id.id ServerAdmin admin@sysadmin.id.id DocumentRoot /var/www/html/sysadmin.id <Directory /var/www/html/sysadmin.id> Options Indexes FollowSymLinks AllowOverride all Order allow,deny Allow from all </Directory> ErrorLog ${APACHE_LOG_DIR}/error.log CustomLog ${APACHE_LOG_DIR}/access.log combined </VirtualHost> |
Membuat file virtual host devops.id
1 | nano /etc/apache2/sites-available/devops.id.conf |
Isinya
1 2 3 4 5 6 7 8 9 10 11 12 13 14 15 16 | <VirtualHost *:8080> ServerName devops.id.id ServerAlias www.devops.id.id ServerAdmin admin@devops.id.id DocumentRoot /var/www/html/devops.id <Directory /var/www/html/devops.id> Options Indexes FollowSymLinks AllowOverride all Order allow,deny Allow from all </Directory> ErrorLog ${APACHE_LOG_DIR}/error.log CustomLog ${APACHE_LOG_DIR}/access.log combined </VirtualHost> |
Cek apakah ada konfigurasi yang salah.
1 | apachectl -t |
Aktifkan 2 konfigurasi virtual host yang sudah dibuat.
1 2 | a2ensite sysadmin.id a2ensite devops.id |
Restart service Apache
1 | systemctl restart apache2 |
Membuat folder root
1 2 | mkdir /var/www/html/sysadmin.id mkdir /var/www/html/devops.id |
Membuat file index.html dan info.php.
1 2 3 4 | echo "<h1>www.sysadmin.id</h1>" | tee /var/www/html/sysadmin.id/index.html echo "<?php phpinfo(); ?>" | tee /var/www/html/sysadmin.id/info.php echo "<h1>www.devops.id</h1>" | tee /var/www/html/devops.id/index.html echo "<?php phpinfo(); ?>" | tee /var/www/html/devops.id/info.php |
Browsing untuk melihat hasilnya
http://sysadmin.id:8080
http://sysadmin.id:8080/info.php
http://devops.id:8080
http://devops.id:8080/info.php
Install dan Konfigurasi Nginx
Install Nginx
1 | apt-get install nginx |
Di Nginx juga dibuat 2 virtual host, koder.id dan dvloper.id.
Buat file virtual host untuk koder.id.
1 | nano /etc/nginx/sites-available/koder.id |
Isinya
1 2 3 4 5 6 7 8 9 10 11 12 13 14 15 16 | server { listen 80; root /var/www/html/koder.id; index index.php index.html index.htm; server_name koder.id www.koder.id; location / { try_files $uri $uri/ /index.php; } location ~ \.php$ { fastcgi_pass unix:/run/php/php7.0-fpm.sock; include snippets/fastcgi-php.conf; } } |
Buat file virtual host untuk dvloper.id.
1 | nano /etc/nginx/sites-available/dvloper.id |
Isinya
1 2 3 4 5 6 7 8 9 10 11 12 13 14 15 16 | server { listen 80; root /var/www/html/dvloper.id; index index.php index.html index.htm; server_name dvloper.id www.dvloper.id; location / { try_files $uri $uri/ /index.php; } location ~ \.php$ { fastcgi_pass unix:/run/php/php7.0-fpm.sock; include snippets/fastcgi-php.conf; } } |
Aktifkan virtual host yang sudah dibuat
1 2 | ln -s /etc/nginx/sites-available/koder.id /etc/nginx/sites-enabled/koder.id ln -s /etc/nginx/sites-available/dvloper.id /etc/nginx/sites-enabled/dvloper.id |
Cek apakah ada kesalahan konfigurasi
1 | nginx -t |
Restart service Nginx
1 | systemctl restart nginx |
Membuat folder root
1 2 | mkdir /var/www/html/koder.id mkdir /var/www/html/dvloper.id |
Membuat file index.html dan info.php
1 2 3 4 | echo "<h1>www.koder.id</h1>" | tee /var/www/html/koder.id/index.html echo "<?php phpinfo(); ?>" | tee /var/www/html/koder.id/info.php echo "<h1>www.dvloper.id</h1>" | tee /var/www/html/dvloper.id/index.html echo "<?php phpinfo(); ?>" | tee /var/www/html/dvloper.id/info.php |
Browse untuk menguji hasilnya
http://koder.id
http://koder.id/info.php
http://dvloper.id
http://dvloper.id/info.php
Dari hasil PHP Info bagian PHP Variables terlihat web server yang digunakan Nginx.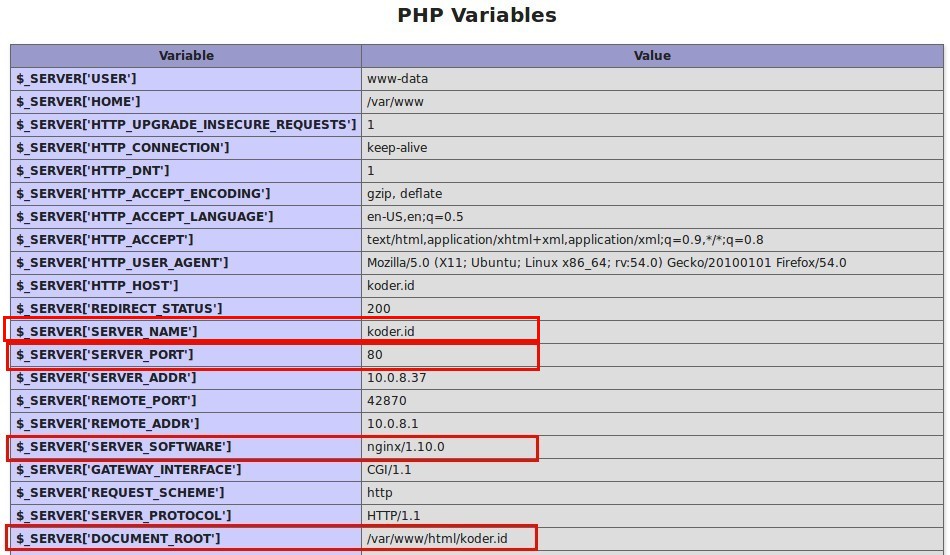
Konfigurasi Nginx untuk Virtual Host pada Apache
Buat file virtual host baru
1 | nano /etc/nginx/sites-available/apache |
Isinya
1 2 3 4 5 6 7 8 9 10 11 12 | server { listen 80; server_name sysadmin.id www.sysadmin.id devops.id www.devops.id; location / { proxy_pass http://127.0.0.1:8080; proxy_set_header Host $host; proxy_set_header X-Real-IP $remote_addr; proxy_set_header X-Forwarded-For $proxy_add_x_forwarded_for; proxy_set_header X-Forwarded-Proto $scheme; } } |
Request yang masuk ke Nginx port 80 (listen 80) akan dialihkan ke Apache port 8080 (proxy_pass http://127.0.0.1:8080;).
Mengaktifkan virtual host Nginx
1 | ln -s /etc/nginx/sites-available/apache /etc/nginx/sites-enabled/apache |
Menguji file konfigurasi Nginx
1 | nginx -t |
Restart service Nginx
1 | systemctl restart nginx |
Browsing kembali halaman http://sysadmin.id/info.php dan http://devops.id/info.php.
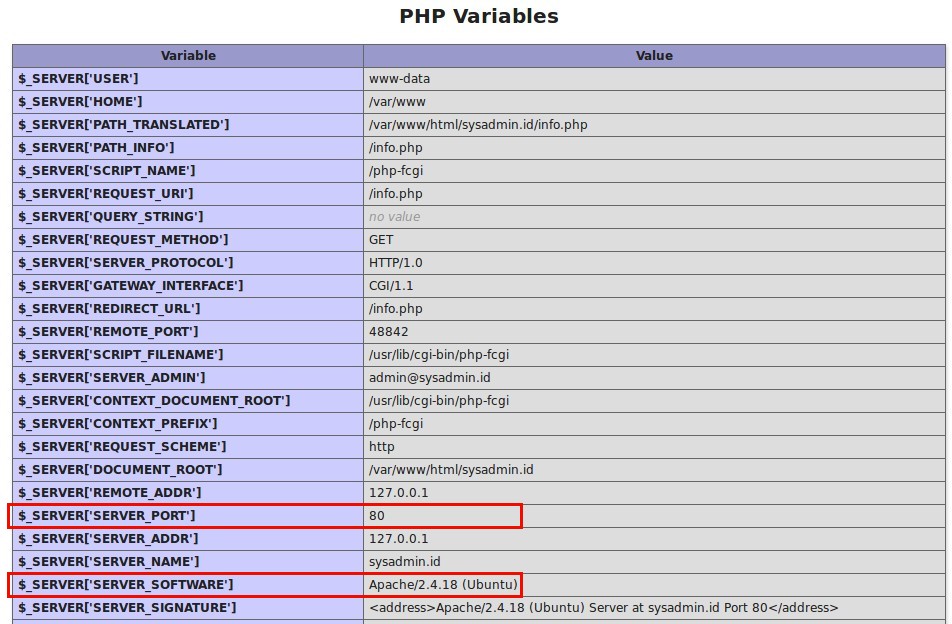
Terlihat bahwa domain yang tadinya hanya bisa diakses melalui port 8080 (Apache) kini bisa diakses melalui port 80 (Nginx). Meskipun port 80 milik Nginx yang digunakan, web server yang digunakan tetap Apache karena request yang masuk dialihkan dari Nginx (80) ke Apache (8080).
Install dan Konfigurasi mod_rpaf
Module mod_rpaf pada Apache berfungsi untuk menulis ulang nilai pada REMOTE_ADDR, HTTPS, dan HTTP_PORT berdasaran nilai yang dikirimkan oleh reverse proxy. Tanpa module ini, beberapa aplikasi berbasis PHP membutuhkan perubahan kode program agar bisa diakses melalui proxy.
Install paket yang dibutuhkan
1 | apt-get install unzip build-essential apache2-dev |
Download source code mod_rpaf terbaru dari GitHub
1 | wget https://github.com/gnif/mod_rpaf/archive/stable.zip |
Extract file
1 | unzip stable.zip |
Masuk ke folder dan compile
1 2 3 | cd mod_rpaf-stable make make install |
Buat file rpaf.load
1 | nano /etc/apache2/mods-available/rpaf.load |
Masukkan baris kode untuk memanggil module mod_rpaf
1 | LoadModule rpaf_module /usr/lib/apache2/modules/mod_rpaf.so |
Buat file konfigurasi mod_rpaf
1 | nano /etc/apache2/mods-available/rpaf.conf |
Isinya
1 2 3 4 5 6 7 8 | <IfModule mod_rpaf.c> RPAF_Enable On RPAF_Header X-Real-Ip RPAF_ProxyIPs 127.0.0.1 RPAF_SetHostName On RPAF_SetHTTPS On RPAF_SetPort On </IfModule> |
Aktifkan module
1 | a2enmod rpaf |
Cek apakah ada kesalahan konfigurasi
1 | apachectl -t |
Restart service Apache
1 | systemctl restart apache2 |
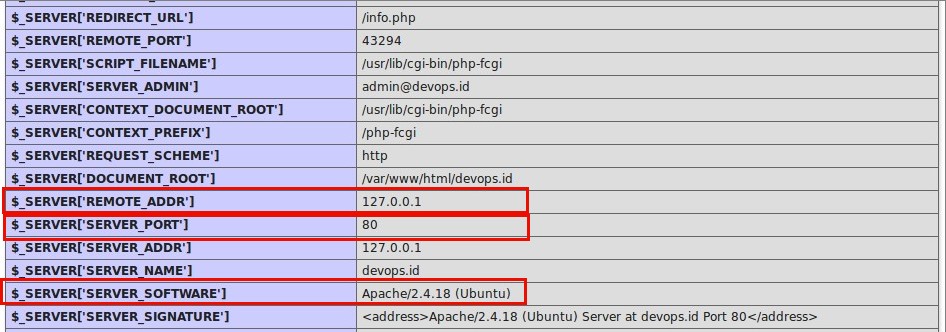
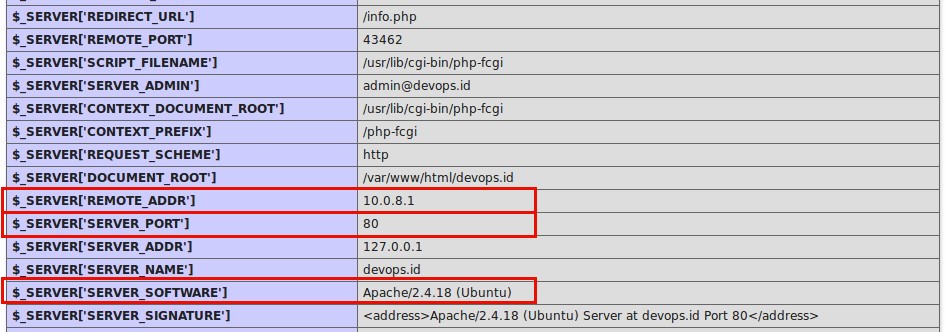
Browsing salah satu halaman phpinfo() dari website Apache (sysadmin.id atau devops.id). Pada bagian PHP Variables, REMOTE_ADDR nilainya sudah berganti dari 127.0.0.1 menjadi alamat IP public komputer visitor.


pak, saya pakai reverse proxy kenapa sering internal server error missconfiguration ya
error log incomplete header fastcgi
cek kembali konfigurasi nginx