DigitalOcean DNS as Private Nameserver
To be able to have a private nameserver for example ns.musaamin.my.id we usually have to install and configure bind, an application to create a DNS server or name server on a Linux server. Another way is by installing a hosting control panel that provides a DNS server feature.
The installation and configuration of this DNS server is quite complicated, especially if you want up to 3 nameservers, for example ns1, ns2, and ns3. Means we have to set up 3 Linux servers.
For DigitalOcean users, we can use private nameservers without having to install and configure DNS servers by utilizing DigitalOcean’s DNS servers.
DigitalOcean DNS is free of charge and can install a maximum of 50 domains, if you want more, you have to send a support ticket. DNS records that can be added are not only DigitalOcean’s server IP addresses but also IP addresses from other parties. Supported DNS records are A, AAAA, CAA, CNAME, MX, NS, TXT, and SRV records.
Get started on DigitalOcean with $200, 60-day credit for new users.
DigitalOcean’s default nameservers are ns1.digitalocean.com, ns2.digitalocean.com, and ns3.digitalocean.com. We can change the nameservers into our own domain names, for example ns1.musaamin.my.id, ns2.musaamin.my.id, and ns3.musaamin.my.id.
Check DigitalOcean’s DNS IP
The first step we take is to find out the IP address of DigitalOcean’s DNS server by using ping.
1 2 3 | ping ns1.digitalocean.com ping ns2.digitalocean.com ping ns3.digitalocean.com |
Result
1 2 3 | ns1.digitalocean.com 173.245.58.51 ns2.digitalocean.com 173.245.59.41 ns3.digitalocean.com 198.41.222.173 |
Create Private Nameserver
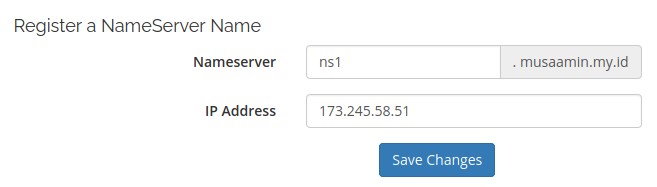
Login to the portal or client area where you bought the domain. Look for the menu to add a private nameserver/child nameserver.
1 2 3 | ns1.musaamin.my.id 173.245.58.51 ns2.musaamin.my.id 173.245.59.41 ns3.musaamin.my.id 198.41.222.173 |
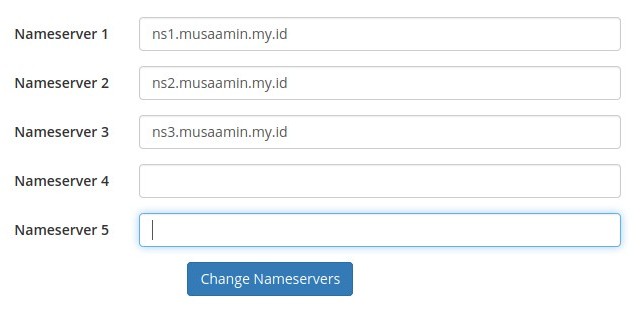
Change Nameserver
Change the domain nameservers to the private nameservers that have been created. Nameserver changes take a maximum of 2×24 hours (domain propagation).
1 2 3 | Nameserver 1: ns1.musaamin.my.id Nameserver 2: ns2.musaamin.my.id Nameserver 3: ns3.musaamin.my.id |
Add Domain at DigitalOcean
Login to DigitalOcean, click the Create->Domain/DNS menu.
Enter the domain name, then Add Domain.
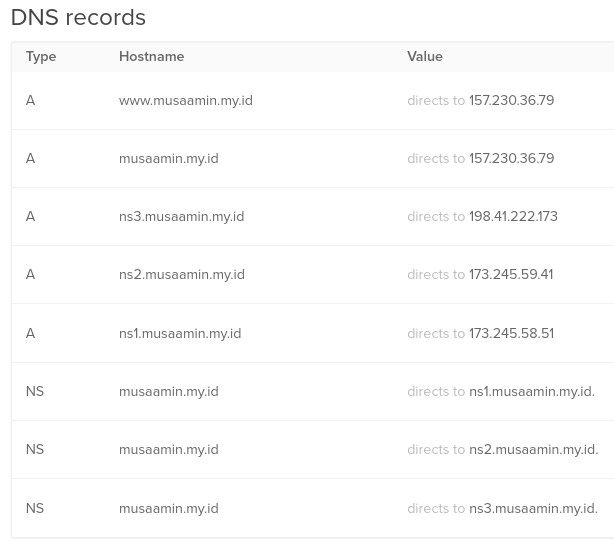
Then change the NS from digitalocean.com to the private nameserver we created and add A records for ns1, ns2, and ns3.
Then we can add other DNS records such as A records for domains and CNAME records for www aliases.
Conclusion
The key to this trick is knowing the IP address of the DNS server that you want to use as a private nameserver. In addition, the DNS server must allow us to use other nameserver names, some DNS server services will not enable the addition of DNS records if they do not use the DNS server provider’s nameservers.
If you found this article helpful and would like to support my work, consider making a donation through PayPal. Your support helps me continue creating useful content and tutorials. Thank you!
Donate via PayPal: https://paypal.me/musaamin