How to Create MySQL Managed Database at DigitalOcean
Managed Database is a cloud service that provides a database engine. With a managed database, users no longer need to install and configure databases, including monitoring and maintaining server infrastructure.
Managed database services aim to make users, especially developers, focus on application development, without having to be bothered with managing databases.
DigitalOcean provides managed database services that support 3 database engines, namely MySQL, PostgreSQL, and Redis.
Get started on DigitalOcean with $200, 60-day credit for new users.
Create a MySQL Managed Database
Creating a managed MySQL database at DigitalOcean is very easy.
- Click the menu Create->Databases
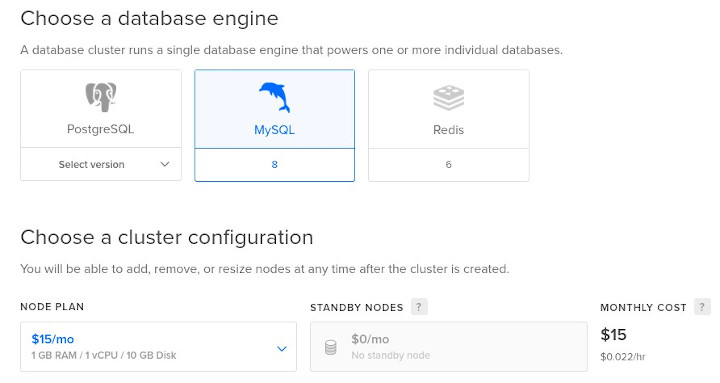
- Choose a database engine, choose MySQL
- Choose a cluster configuration, di sini saya memakai spesifikasi 1GB RAM, 1vCPU, 10GB disk, tanpa Standby Nodeshere I use the specifications of 1GB RAM, 1vCPU, 10GB disk, without Standby Nodes. Standby Nodes are the nodes that become the backup server, if a failure occurs on the main database server, the database service is switched to the standby node (automatic failover)
- Choose a datacenter, here I use Singapore
- Choose a unique database cluster name, enter a name for the cluster database
- Finally, click the button Create a Database Cluster
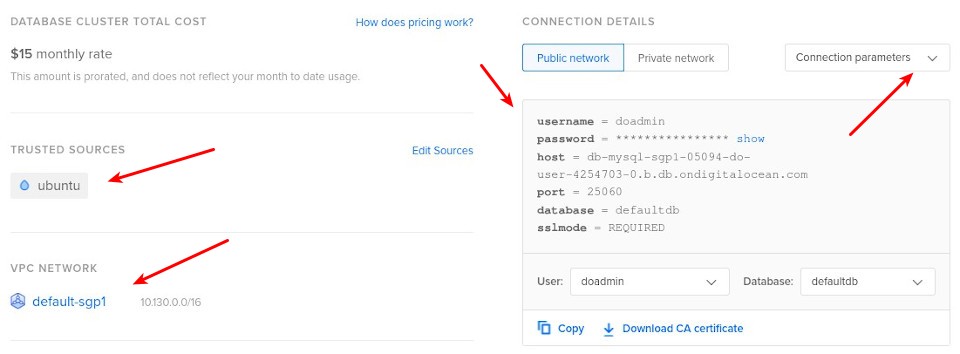
Connection to the Database Cluster
After the database cluster is created, then securing the cluster database.
- Secure this database cluster, in the field Add trusted sources, enter the name of the droplet, kubernetes cluster, tags, or IP address that is granted access to the database. Here I enter the ubuntu droplet that is in the same region and private network. Then click Allow these inbound sources only
- Connection details, displayed connection information to the cluster database, and connections via public and private networks. Click Continue
- Next steps, a command is displayed to perform a database migration. Click Great, I’m done
Create User and Database
Creating a user and database can be done directly in the tab Users & Databases.
Create User
- Add new user, enter a new user
- Password encryption, choose Default – MySQL 8+ if the MySQL client support MySQL 8 password encryption and select Legacy – MySQL 5.x otherwise
- Password is provided automatically
Create Database
- Add new database, enter a new database name
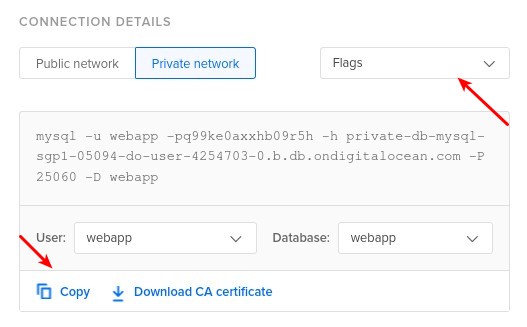
Connect to Database
Previously the database cluster was set up so that it could only be accessed by the ubuntu droplet, therefore database access tests were run on that droplet.
Connect to database using the MySQL client, install the MySQL client on Ubuntu.
1 | apt install mysql-client -y |
Copy the command to connect to the database (flags) shown in the connection details.
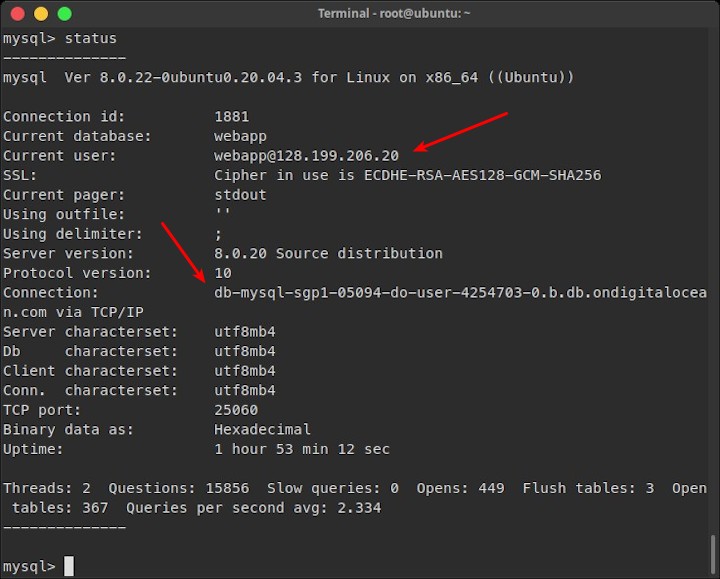
Testing database access via the public network.
1 | mysql -u webapp -pq99ke0axxhb09r5h -h db-mysql-sgp1-05094-do-user-4254703-0.b.db.ondigitalocean.com -P 25060 -D webapp |
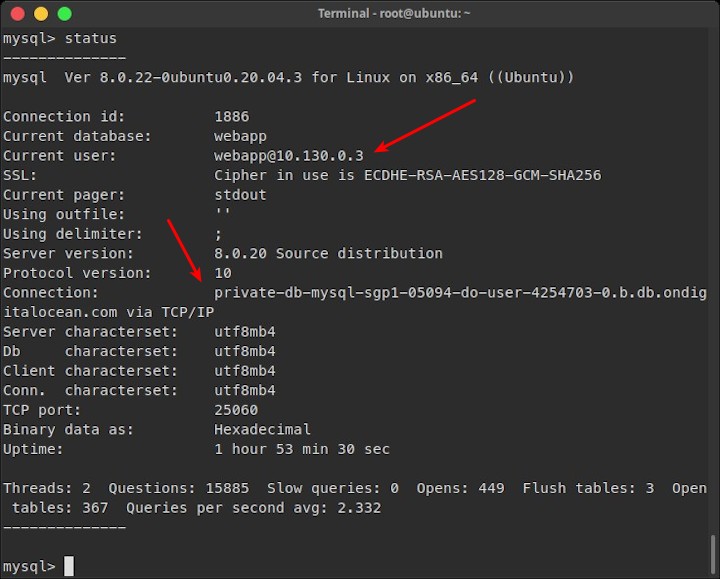
Testing database access via private network.
1 | mysql -u webapp -pq99ke0axxhb09r5h -h private-db-mysql-sgp1-05094-do-user-4254703-0.b.db.ondigitalocean.com -P 25060 -D webapp |
Show all databases.
1 | show databases; |
The result.
1 2 3 4 5 6 7 8 9 10 11 | +--------------------+ | Database | +--------------------+ | defaultdb | | information_schema | | mysql | | performance_schema | | sys | | webapp | +--------------------+ 6 rows in set (0.00 sec) |
If you found this article helpful and would like to support my work, consider making a donation through PayPal. Your support helps me continue creating useful content and tutorials. Thank you!
Donate via PayPal: https://paypal.me/musaamin