How to Install CKAN for Open Data Portal on Ubuntu 20.04
Comprehensive Knowledge Archive Network (CKAN) is an open source software for open data portal, CMS that can help us manage and publish data sets. CKAN is used by central and local governments, research institutions, and other organizations to publish data.
An example of usage in Indonesia is Satu Data Indonesia (SDI) which is a government data management policy with the aim of creating quality data, easily accessible, and can be shared between central and regional agencies. This SDI policy is contained in Presidential Regulation No. 39 of 2019 concerning One Indonesian Data. Through SDI, all government data and data from other related agencies can end up in the Satu Data Indonesia Portal (data.go.id). Examples of local governments that have open data portals are Open Data Jakarta, Open Data Bandung, and Open Data West Kalimantan.
Tech Stack
CKAN uses the Python programming language as the backend, JavaScript as the frontend, the PostgreSQL database and the Solr search engine. CKAN allows for additional extensions or features because it uses a modular architecture. Besides that, CKAN also has an API feature.
System Requirements
Hardware Requirements
For portals on a national scale with high traffic:
- 2 servers with 8GB RAM. One server for web and the other for database/Solr
- 160GB storage. The web server can be bigger, as needed, how much data you want to store
- Quad core processor. Faster is better
For regional level portals with lower traffic:
- 2 servers with RAM 2GB
- Storage 80GB
- Dual core processor
Web and database can be combined on the same server, but recommends separating them for security reasons.
Software Requirements
Operating system
Ubuntu 16.04 64bit is recommended, CKAN is available in .deb package. CKAN has also been tested on CentOS and other major Linux distributions.
Web server
- Apache
- Nginx, for https and caching
- Python 2.7.x
Database server
- Postgres 9.3+
- Redis
- Tomcat/Jetty + Solr
The system requirements above are based on CKAN’s hosting guidelines, last updated 12-20-2017.
Specifications in the Tutorial
Server specifications and software used in this tutorial:
- VPS 1CPU, RAM 2GB, Disk 50GB
- Ubuntu 20.04
- Nginx 1.18
- Python 3.8.5
- Supervisor 4.1.0
- PostgreSQL 12.4
- Redis 5.0.7
- Solr 3.6.2
- CKAN package 2.9.1
Port used:
| Service | Port | Used for |
|---|---|---|
| Nginx | 80 | Proxy |
| uWSGI | 8080 | Web server |
| uWSGI | 8800 | DataPusher |
| Solr/Jetty | 8983 | Search |
| PostgreSQL | 5432 | Database |
| Redis | 6379 | Search |
1. Install CKAN package
Update Ubuntu.
1 2 | sudo apt update sudo apt upgrade -y |
Install package dependencies.
1 | sudo apt install -y libpq5 redis-server nginx supervisor |
Download CKAN package.
1 | wget http://packaging.ckan.org/python-ckan_2.9-py3-focal_amd64.deb |
Install CKAN package.
1 | sudo dpkg -i python-ckan_2.9-py3-focal_amd64.deb |
2. Install PostgreSQL
Install PostgreSQL database.
1 | sudo apt install postgresql -y |
Check if PostgreSQL is installed properly by displaying the existing database.
1 | sudo -u postgres psql -l |
Create a PostgreSQL user named ckan_default.
1 | sudo -u postgres createuser -S -D -R -P ckan_default |
Create a PostgreSQL database named ckan_default.
1 | sudo -u postgres createdb -O ckan_default ckan_default -E utf-8 |
Check whether the ckan_default database was successfully created.
1 | sudo -u postgres psql -l |
The result.
1 2 3 4 5 6 7 8 9 10 | List of databases Name | Owner | Encoding | Collate | Ctype | Access privileges --------------+--------------+----------+---------+---------+----------------------- ckan_default | ckan_default | UTF8 | C.UTF-8 | C.UTF-8 | postgres | postgres | UTF8 | C.UTF-8 | C.UTF-8 | template0 | postgres | UTF8 | C.UTF-8 | C.UTF-8 | =c/postgres + | | | | | postgres=CTc/postgres template1 | postgres | UTF8 | C.UTF-8 | C.UTF-8 | =c/postgres + | | | | | postgres=CTc/postgres (4 rows) |
3. Install Solr
Install Solr.
1 | sudo apt install solr-tomcat -y |
Open the Tomcat configuration file.
1 | sudo nano /etc/tomcat9/server.xml |
Change the default Tomcat port from 8080 to 8983.
1 | Connector port="8983" protocol="HTTP/1.1" |
Replace the default schema.xml file with a symlink to the CKAN schema file included in sources.
1 2 | sudo mv /etc/solr/conf/schema.xml /etc/solr/conf/schema.xml.bak sudo ln -s /usr/lib/ckan/default/src/ckan/ckan/config/solr/schema.xml /etc/solr/conf/schema.xml |
Restart Solr by restarting tomcat.
1 | sudo systemctl restart tomcat9 |
4. Configure CKAN
Open the CKAN configuration file.
1 | sudo nano /etc/ckan/default/ckan.ini |
Enable the solr_url option by removing the hashtag (#).
1 | solr_url=http://127.0.0.1:8983/solr |
The URL for the CKAN site, for example, uses the subdomain data.defnex.com.
1 | ckan.site_url = http://data.defnex.com |
Options for connecting to PostgreSQL databases, for example username = ckan_default, password = secretpassword, and database = ckan_default.
1 | sqlalchemy.url = postgresql://ckan_default:secretpassword@localhost/ckan_default |
Initialize the CKAN database.
1 | sudo ckan db init |
The result.
1 2 3 4 | 2020-11-13 07:12:12,813 INFO [ckan.cli.db] Initialize the Database 2020-11-13 07:12:15,420 INFO [ckan.model] CKAN database version upgraded: base -> ccd38ad5fced (head) 2020-11-13 07:12:15,420 INFO [ckan.model] Database initialised Initialising DB: SUCCESS |
Restart the Supervisor and check the status.
1 2 | sudo supervisorctl reload sudo supervisorctl status |
The result.
1 2 3 | ckan-datapusher:ckan-datapusher-00 RUNNING pid 2711, uptime 0:00:21 ckan-uwsgi:ckan-uwsgi-00 RUNNING pid 2712, uptime 0:00:21 ckan-worker:ckan-worker-00 RUNNING pid 2713, uptime 0:00:21 |
Restart Nginx.
1 | sudo systemctl restart nginx |
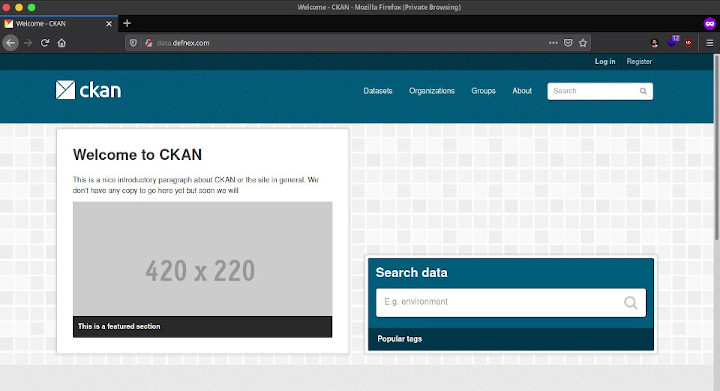
5. Testing
Test by browsing http://localhost or http://data.defnex.com.
6. Install SSL
Backup the default ckan server block configuration file.
1 2 | cd /etc/nginx/sites-available/ sudo cp ckan ckan.bak |
Open the ckan server block configuration file.
1 | sudo nano ckan |
Enter server_name and log options.
1 2 3 4 5 6 7 8 9 10 11 12 13 14 15 16 17 18 19 20 21 22 23 | proxy_cache_path /tmp/nginx_cache levels=1:2 keys_zone=cache:30m max_size=250m; proxy_temp_path /tmp/nginx_proxy 1 2; server { listen 80; server_name data.defnex.com; client_max_body_size 100M; location / { proxy_pass http://127.0.0.1:8080/; proxy_set_header Host $host; proxy_cache cache; proxy_cache_bypass $cookie_auth_tkt; proxy_no_cache $cookie_auth_tkt; proxy_cache_valid 30m; proxy_cache_key $host$scheme$proxy_host$request_uri; # In emergency comment out line to force caching # proxy_ignore_headers X-Accel-Expires Expires Cache-Control; } access_log /var/log/nginx/data.defnex.com_access.log; error_log /var/log/nginx/data.defnex.com_error.log warn; } |
Nginx configuration test.
1 | sudo nginx -t |
Restart Nginx.
1 2 | sudo systemctl restart nginx sudo systemctl status nginx |
Test again to access http://data.defnex.com, if there are no problems after changing the Nginx configuration.
Install certbot for Let’s Encrypt SSL.
1 2 | sudo snap install --classic certbot sudo ln -s /snap/bin/certbot /usr/bin/certbot |
Request SSL for data.defnex.com.
1 | sudo certbot --nginx -d data.defnex.com |
Test browse https://data.defnex.com.

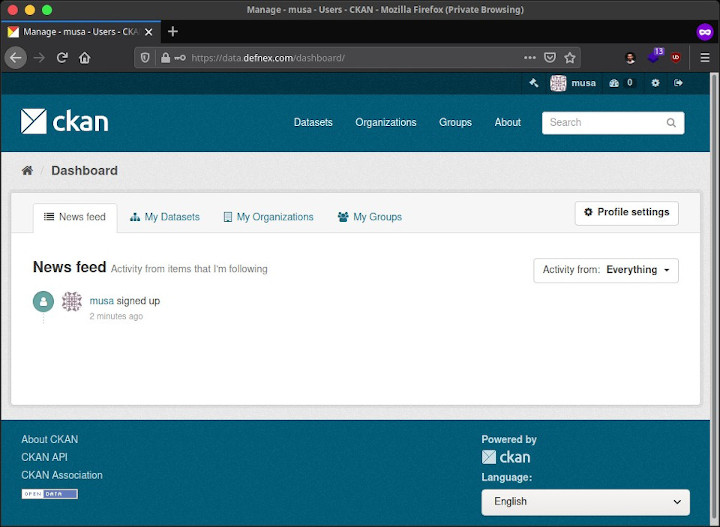
7. Create a user sysadmin
Use the CKAN command line interface to create a first-time sysadmin user and also to create test data.
Enabling virtualenv.
1 2 | . /usr/lib/ckan/default/bin/activate cd /usr/lib/ckan/default/src/ckan |
Create a new user with the name musa and make it a sysadmin.
1 | ckan -c /etc/ckan/default/ckan.ini sysadmin add musa email=trial@musaamin.web.id name=musa |
Hasilnya.
1 2 3 4 5 6 | User "musa" not found Create new user: musa? [Y/n]: y Password : Repeat for confirmation: Successfully created user: musa Added musa as sysadmin |
Or if you want to make an existing user as sysadmin.
1 | ckan -c /etc/ckan/default/ckan.ini sysadmin add musa |
Test the newly created sysadmin user by logging in on the CKAN web.
8. Use of Resources
Check the use of VPS resources using htop.
1 2 | sudo apt install htop -y htop |

If you found this article helpful and would like to support my work, consider making a donation through PayPal. Your support helps me continue creating useful content and tutorials. Thank you!
Donate via PayPal: https://paypal.me/musaamin