Linux Server System Monitoring dengan Amplify Nginx

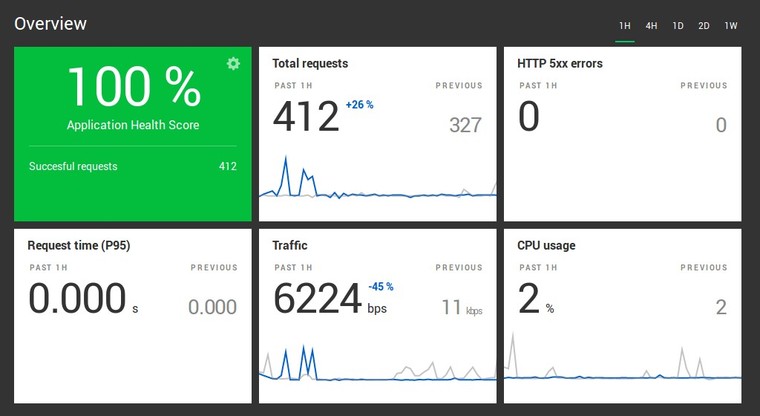
Amplify adalah layanan dari Nginx untuk melakukan system monitoring Linux server yang menjalankan web server Nginx dan aplikasi berbasis PHP. Selain itu dapat memonitor database MySQL, connections, requests, HTTP status, response time, traffic, dsb.
0. Perangkat yang Digunakan
Tutorial ini menggunakan:
- VPS Vultr CentOS 7
- Nginx 1.12.2
- PHP-FPM 7.2 Remi
- MariaDB 10.3
1. Cara Install Amplify Nginx
- Daftar akun di amplify.nginx.com.
- Setelah mendaftar, secara otomatis login dan ditampilkan langkah install Aplify Agent di Linux server.
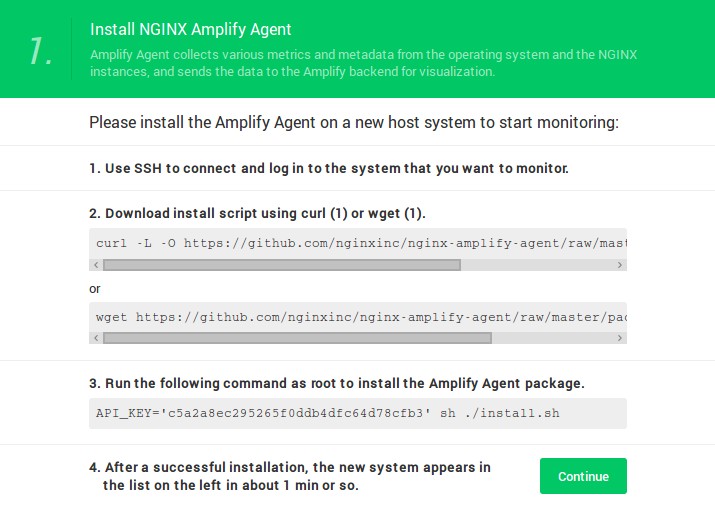
Petunjuk install Amplify agent - Login ke Linux server melalui SSH.
- Jalankan perintah curl atau wget yang diinstruksikan untuk langkah install Amplify Agent.
- Setelah itu jalankan perintah selanjutnya yang terdapat API_KEY dan menjalankan script install.sh.
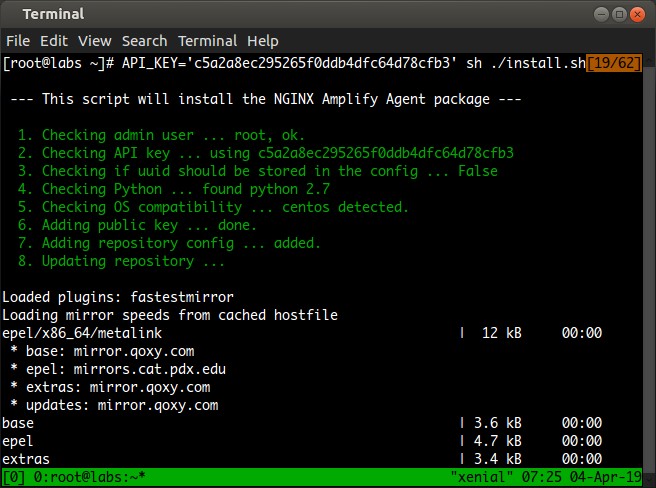
Install Amplify agent - Setelah Amplify Agent selesai terinstall, klik Continue di dashboard Amplify.
Setelah melakukan install Amplify agent, lihat kembali dashboard Amplify. Sudah ada 1 (satu) system yang dimonitoring.

2. Konfigurasi Nginx Metrics
Selanjutnya melakukan konfigurasi Nginx agar metrics dapat tampil di Amplify.
1 2 3 4 5 6 7 8 9 10 11 12 13 14 15 16 17 18 19 20 21 22 23 24 25 26 | # cd /etc/nginx # grep -i include\.*conf nginx.conf # cat > conf.d/stub_status.conf server { listen 127.0.0.1:80; server_name 127.0.0.1; location /nginx_status { stub_status on; allow 127.0.0.1; deny all; } } CTRL+D untuk save # ls -la conf.d/stub_status.conf # nginx -t nginx: the configuration file /etc/nginx/nginx.conf syntax is ok nginx: configuration file /etc/nginx/nginx.conf test is successful # kill -HUP `cat /var/run/nginx.pid` # systemctl restart nginx |
Menguji konfigurasi dengan curl.
1 2 3 4 5 | $ curl http://127.0.0.1/nginx_status Active connections: 2 server accepts handled requests 344014 344014 661581 Reading: 0 Writing: 1 Waiting: 1 |
3. Additional Nginx Metrics
Konfigurasi tambahan untuk Nginx metrics.
1 | # nano /etc/nginx/nginx.conf |
Cari opsi log_format lalu ubah menjadi seperti di bawah ini.
1 2 3 4 5 6 7 8 | log_format main_ext '$remote_addr - $remote_user [$time_local] "$request" ' '$status $body_bytes_sent "$http_referer" ' '"$http_user_agent" "$http_x_forwarded_for" ' '"$host" sn="$server_name" ' 'rt=$request_time ' 'ua="$upstream_addr" us="$upstream_status" ' 'ut="$upstream_response_time" ul="$upstream_response_length" ' 'cs=$upstream_cache_status' ; |
Opsi access_log
1 | access_log /var/log/nginx/access.log main_ext; |
Opsi error_log
1 | error_log /var/log/nginx/error.log warn; |
Restart Nginx.
1 | # systemctl restart nginx |
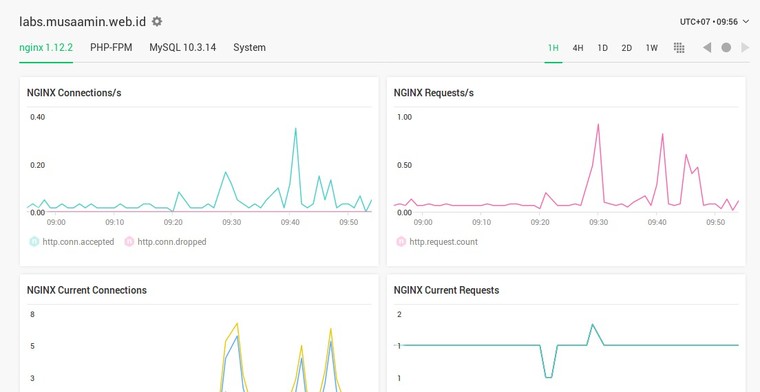
Setelah melakukan konfigurasi di atas, tab Nginx sudah menampilkan statistiknya.
4. Konfigurasi PHP-FPM Metrics
Melakukan konfigurasi metrics untuk PHP-FPM.
Ubah konfigurasi PHP-FPM pool.
1 | # nano /etc/opt/remi/php72/php-fpm.d/www.conf |
Aktifkan opsi pm.status_path.
1 | pm.status_path = /status |
Ubah user, group, listen.owner ke user web server Nginx, di CentOS nama usernya nginx, di Ubuntu/Debian usernya www-data.
1 2 3 4 5 | user = nginx group = nginx listen.owner = nginx listen.group = nginx listen.mode = 0660 |
Ubah listen address FastCGI.
1 | listen = /run/php7.2-fpm.sock |
Restart service PHP-FPM
1 2 | # systemctl restart php72-php-fpm # systemctl status php72-php-fpm |
Mengecek PHP-FPM listen socket hak aksesnya sudah cocok.
1 2 | # ls -l /run/php7.2-fpm.sock srw-rw---- 1 nginx nginx 0 Apr 8 08:55 /run/php7.2-fpm.sock |
Mengecek PHP-FPM status pool dengan melakukan query. Membutuhkan cgi-fcgi tool, biasanya berasal dari paket libfcgi-dev (Ubuntu/Debian) atau fcgi-devel (CentOS).
1 2 3 4 5 6 7 8 9 10 11 12 13 14 15 16 17 18 19 20 21 22 23 | # yum install fcgi-devel -y # SCRIPT_NAME=/status SCRIPT_FILENAME=/status QUERY_STRING= REQUEST_METHOD=GET cgi-fcgi -bind -connect /run/php7.2-fpm.sock X-Powered-By: PHP/7.2.17 Expires: Thu, 01 Jan 1970 00:00:00 GMT Cache-Control: no-cache, no-store, must-revalidate, max-age=0 Content-type: text/plain;charset=UTF-8 pool: www process manager: dynamic start time: 08/Apr/2019:08:55:24 +0700 start since: 338 accepted conn: 18 listen queue: 0 max listen queue: 0 listen queue len: 0 idle processes: 4 active processes: 1 total processes: 5 max active processes: 1 max children reached: 0 slow requests: 0 |
Setelah melakukan konfigurasi di atas, harusnya tab metrics PHP-FPM sudah tampil di dashboard Amplify Nginx.
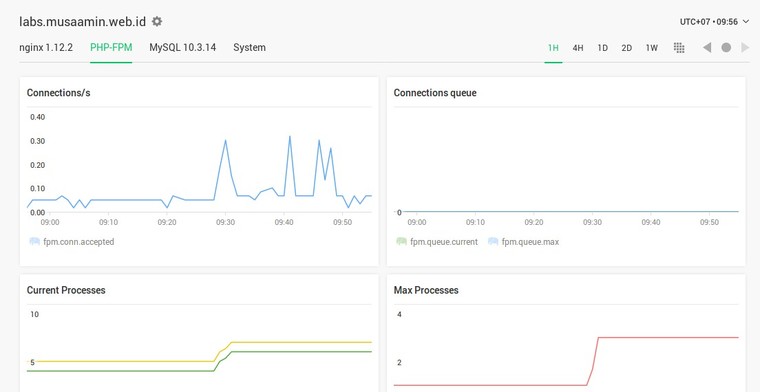
5. Konfigurasi MySQL/MariaDB Metrics
Selanjutnya melakukan konfigurasi untuk MySQL/MariaDB metrics. Yang berbeda dari MySQL dengan MariaDB adalah lokasi file socket.
Membuat user MariaDB untuk Amplify agent.
1 2 3 4 | # mysql -u root -p mysql> CREATE USER 'amplify-agent'@'localhost' IDENTIFIED BY 'rahasia'; Query OK, 0 rows affected (0.01 sec) |
Menguji apakah user baru bisa membaca MariaDB metrics.
1 2 3 4 5 6 7 8 9 10 11 12 | # mysql -u amplify-agent -p MariaDB [(none)]> show global status; +--------------------------------------------------------------+--------------------------------------------------+ | Variable_name | Value | +--------------------------------------------------------------+--------------------------------------------------+ | Aborted_clients | 0 | | ... | ... | | wsrep_thread_count | 0 | +--------------------------------------------------------------+--------------------------------------------------+ 532 rows in set (0.002 sec) |
Konfigurasi Amplify agent agar dapat membaca MariaDB metrics.
1 2 3 4 5 6 7 8 | [extensions] ... mysql = True [mysql] unix_socket = /var/lib/mysql/mysql.sock user = amplify-agent password = rahasia |
Restart service amplify-agent.
1 | # service amplify-agent restart |
Setelah melakukan konfigurasi di atas, akan bertambah tab metrics MySQL 10.3.x.

6. Alerts
Terdapat juga fitur Alerts yang akan mengirimkan notifikasi ke email ketika terjadi kondisi tertentu, misalnya pemakaian CPU atau RAM hampir terpakai semua.
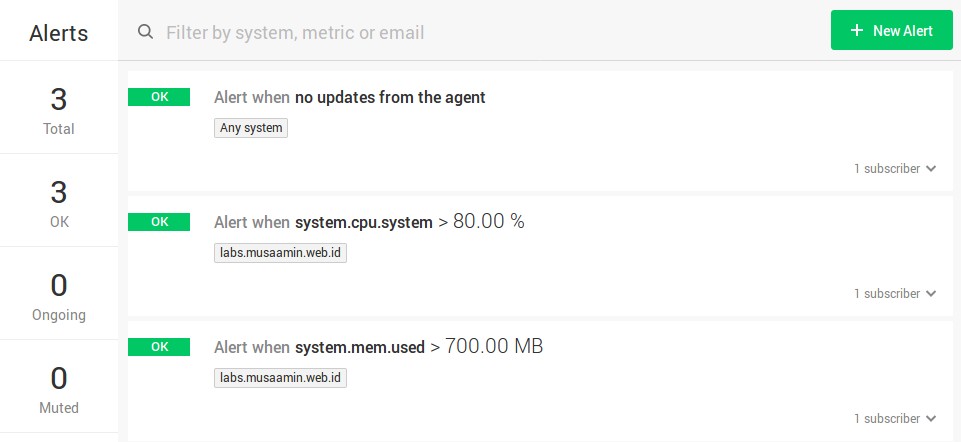
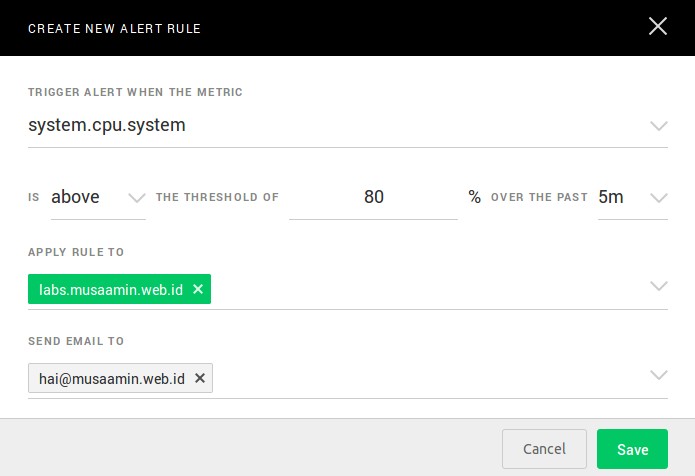
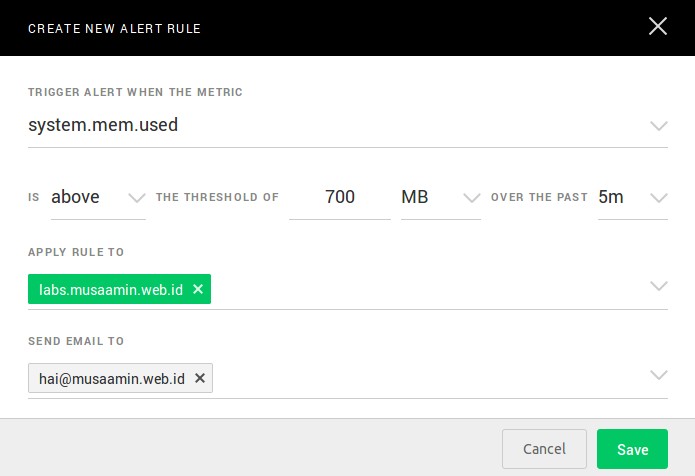
Dokumentasi secara lengkap silakan baca di amplify.nginx.com/docs.
Selamat mencoba 🙂

Apa kita bisa lihat log berikut secara realtime di amplify?
/var/log/nginx/access.log
/var/log/nginx/error.log
Terima kasih, pak Musa.
dari dokumentasi Amplify “NGINX metrics. The agent collects a lot of NGINX related metrics from stub_status, the NGINX Plus status API, the NGINX log files, and from the NGINX process state.”