Cara Setting Nginx + SSL Sebagai Reverse Proxy untuk Apache di Ubuntu 18.04

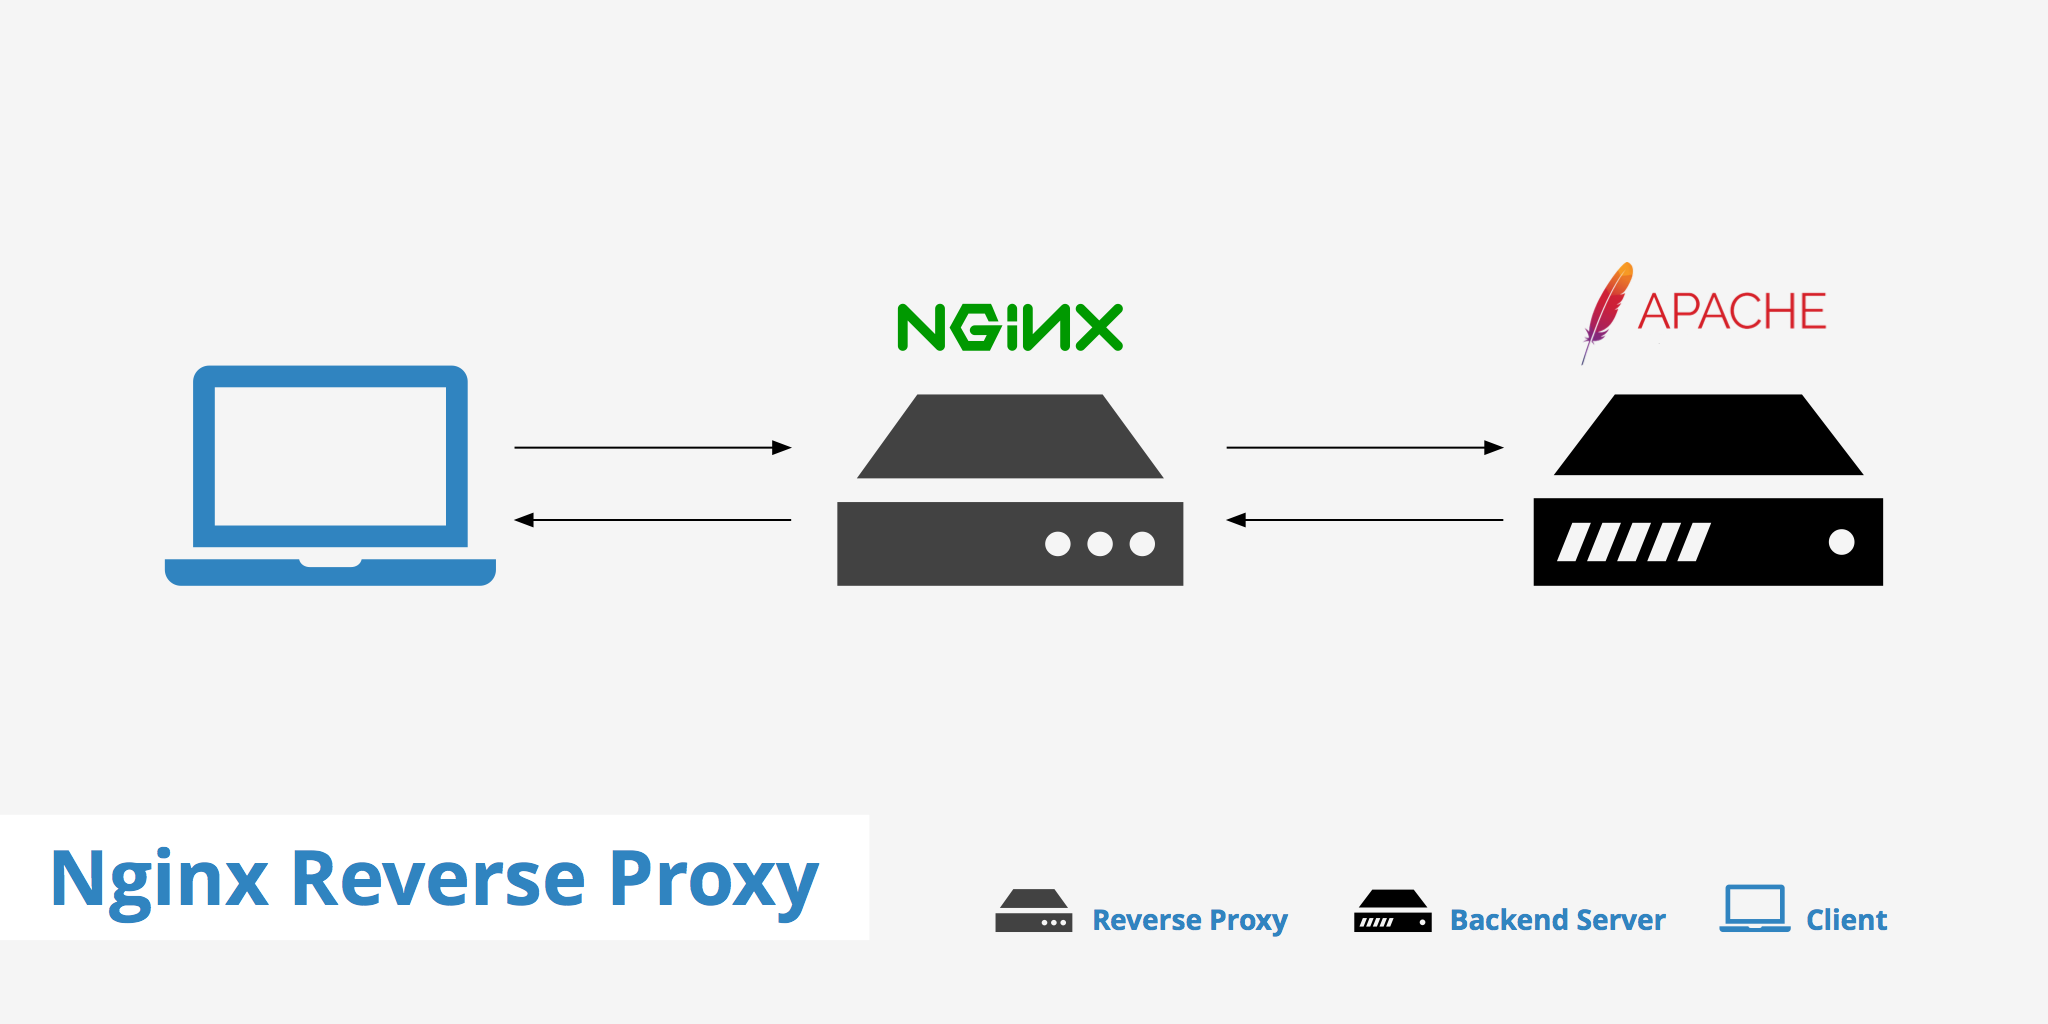
Nginx dan Apache dapat digunakan secara bersamaan di mana Nginx bertindak sebagai reverse proxy yang menerima permintaan dari client dan meneruskannya ke web server lain seperti Apache, kemudian Apache mengirimkan kembali respon yang diminta oleh Nginx untuk dikirimkan ke client. Hal ini dilakukan agar kedua web server ini bisa saling menutupi kekurangan.
0.Install Apache
Install Apache web server terlebih dahulu
1 2 | apt update apt install apache2 php-fpm -y |
Install FastCGI module
1 2 | wget https://mirrors.edge.kernel.org/ubuntu/pool/multiverse/liba/libapache-mod-fastcgi/libapache2-mod-fastcgi_2.4.7~0910052141-1.2_amd64.deb dpkg -i libapache2-mod-fastcgi_2.4.7~0910052141-1.2_amd64.deb |
1.Setting Apache
Mengubah nama file konfigurasi Apache port.conf
1 | mv /etc/apache2/ports.conf /etc/apache2/ports.conf.default |
Membuat file baru port.conf dengan nomor port 8080
1 | echo "Listen 8080" | tee /etc/apache2/ports.conf |
Menonaktifkan Apache virtual host 000-default
1 | a2dissite 000-default |
Membuat file konfigurasi virtual host
1 | vim /etc/apache2/sites-available/001-default.conf |
Memasukkan konfigurasi 001-default.conf
1 2 3 4 5 6 | <VirtualHost *:8080> ServerAdmin webmaster@localhost DocumentRoot /var/www/html ErrorLog ${APACHE_LOG_DIR}/error.log CustomLog ${APACHE_LOG_DIR}/access.log combined </VirtualHost> |
Mengaktifkan virtual host 001-default.conf
1 | a2ensite 001-default |
Restart Apache
1 | systemctl restart apache2 |
Verifikasi apakah Apache sudah berjalan di port 8080
1 | netstat -tulpn |
Hasilnya terlihat bahwa apache2 berjalan di port 8080
1 2 3 4 5 6 | Active Internet connections (only servers) Proto Recv-Q Send-Q Local Address Foreign Address State PID/Program name tcp 0 0 127.0.0.53:53 0.0.0.0:* LISTEN 870/systemd-resolve tcp 0 0 0.0.0.0:22 0.0.0.0:* LISTEN 1065/sshd tcp6 0 0 :::8080 :::* LISTEN 8774/apache2 tcp6 0 0 :::22 :::* LISTEN 1065/sshd |
2.Setting Apache untuk menggunakan mod_fastcgi
Mengaktifkan actions module
1 | a2enmod actions |
Mengubah nama file konfigurasi FastCGI
1 | mv /etc/apache2/mods-enabled/fastcgi.conf /etc/apache2/mods-enabled/fastcgi.conf.default |
Membuat file konfigurasi baru untuk FastCGI
1 | vim /etc/apache2/mods-enabled/fastcgi.conf |
Memasukkan konfigurasi FastCGI
1 2 3 4 5 6 7 8 9 10 11 | <IfModule mod_fastcgi.c> AddHandler fastcgi-script .fcgi FastCgiIpcDir /var/lib/apache2/fastcgi AddType application/x-httpd-fastphp .php Action application/x-httpd-fastphp /php-fcgi Alias /php-fcgi /usr/lib/cgi-bin/php-fcgi FastCgiExternalServer /usr/lib/cgi-bin/php-fcgi -socket /run/php/php7.2-fpm.sock -pass-header Authorization <Directory /usr/lib/cgi-bin> Require all granted </Directory> </IfModule> |
Tes konfigurasi Apache
1 | apachectl -t |
Hasilnya Syntax OK, restart Apache
1 | systemctl restart apache2 |
3.Verifikasi PHP
Verifikasi apakah script PHP sudah bisa dijalankan oleh Apache web server
Membuat file info.php untuk memanggil fungsi phpinfo
1 | echo "<?php phpinfo(); ?>" | tee /var/www/html/info.php |
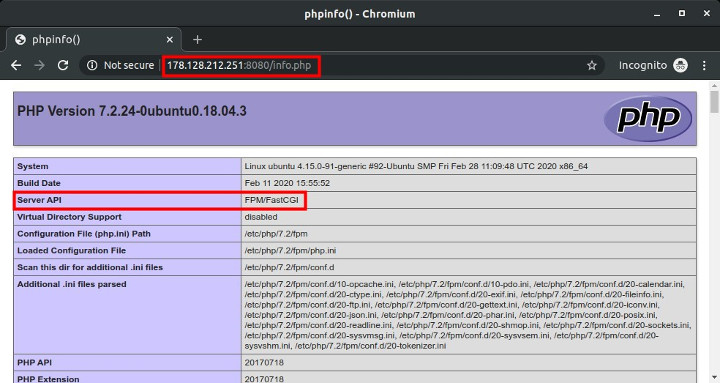
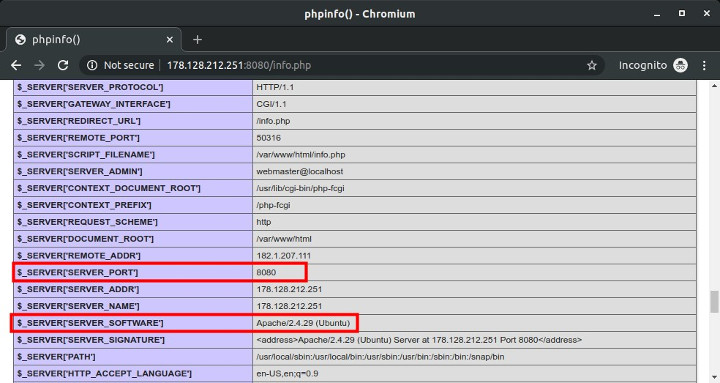
Browse http://IP_SERVER:8080/info.php, cek Server API, SERVER_PORT, dan SERVER_SOFTWARE.
4.Membuat Apache Virtual Host
Membuat konfigurasi Apache virtual host untuk subdomain web.defnex.com
Membuat folder document root
1 | mkdir /var/www/web.defnex.com |
Membuat file index.html
1 | echo "<h1>web.defnex.com</h1>" | tee /var/www/web.defnex.com/index.html |
Membuat file info.php
1 | echo "<?php phpinfo(); ?>" | tee /var/www/web.defnex.com/info.php |
Membuat file virtual host untuk web.defnex.com
1 | vim /etc/apache2/sites-available/web.defnex.com.conf |
Memasukkan konfigurasi virtual host
1 2 3 4 5 6 7 8 9 10 11 | <VirtualHost *:8080> ServerName web.defnex.com DocumentRoot /var/www/web.defnex.com <Directory /var/www/web.defnex.com> Options Indexes FollowSymLinks MultiViews AllowOverride All Require all granted </Directory> ErrorLog /var/log/apache2/web.defnex.com_error.log CustomLog /var/log/apache2/web.defnex.com_access.log combined </VirtualHost> |
Mengaktifkan virtual host
1 | a2ensite web.defnex.com |
Mengecek konfigurasi Apache
1 | apachectl -t |
Restart Apache
1 | systemctl restart apache2 |
Verifikasi konfigurasi virtual host apakah sudah berfungsi dengan baik, browse http://web.defnex.com:8080

5.Install dan Setting Nginx
Install Nginx
1 | apt install nginx -y |
Membuat konfigurasi Nginx server block untuk web.defnex.com
1 | vim /etc/nginx/conf.d/web.defnex.com.conf |
Memasukkan konfigurasi server block
1 2 3 4 5 6 7 8 9 10 11 12 13 14 15 16 17 18 19 20 21 22 23 24 25 | server { listen 80; server_name web.defnex.com; root /var/www/web.defnex.com; index index.php index.htm index.html; location / { try_files $uri $uri/ /index.php?$query_string; } location ~ \.php$ { proxy_pass http://178.128.212.251:8080; proxy_set_header Host $host; proxy_set_header X-Real-IP $remote_addr; proxy_set_header X-Forwarded-For $proxy_add_x_forwarded_for; proxy_set_header X-Forwarded-Proto $scheme; } location ~ /\.ht { deny all; } access_log /var/log/nginx/web.defnex.com_access.log; error_log /var/log/nginx/web.defnex.com_error.log warn; } |
Tes konfigurasi Nginx
1 | nginx -t |
Hasilnya
1 2 | nginx: the configuration file /etc/nginx/nginx.conf syntax is ok nginx: configuration file /etc/nginx/nginx.conf test is successful |
Restart Nginx
1 2 | systemctl restart nginx systemctl status nginx |
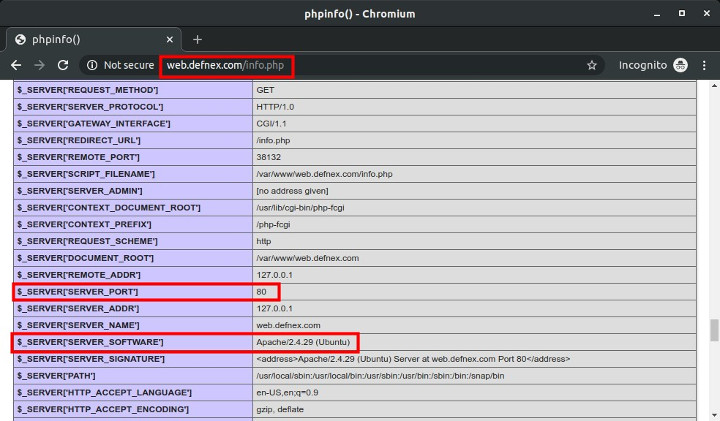
Verifikasi Nginx reverse proxy dengan mengakses http://web.defnex.com/info.php
6.Install dan Konfigurasi mod_rpaf
Apache module mod_rpaf menulis ulang nilai dari REMOTE_ADDR, HTTPS, dan HTTP_PORT. Jika tanpa module ini maka yang terbaca di Apache log adalah IP dari Nginx bukan dari visitor.
Install paket yang dibutuhkan untuk build module
1 | apt install unzip build-essential apache2-dev -y |
Download source code mod_rpaf dari GitHub
1 | wget https://github.com/gnif/mod_rpaf/archive/stable.zip -O mod_rpaf.zip |
Extract file mod_rpaf.zip
1 | unzip mod_rpaf.zip |
Compile mod_rpaf
1 2 3 | cd mod_rpaf-stable make make install |
Membuat file rpaf.load
1 | vim /etc/apache2/mods-available/rpaf.load |
Memasukkan konfigurasi load module
1 | LoadModule rpaf_module /usr/lib/apache2/modules/mod_rpaf.so |
Membuat file konfigurasi rpaf.conf
1 | vim /etc/apache2/mods-available/rpaf.conf |
Memasukkan konfigurasi module, RPAF_ProxyIPs diisi dengan IP_SERVER
1 2 3 4 5 6 7 8 | <IfModule mod_rpaf.c> RPAF_Enable On RPAF_Header X-Real-Ip RPAF_ProxyIPs 178.128.212.251 RPAF_SetHostName On RPAF_SetHTTPS On RPAF_SetPort On </IfModule> |
Mengaktifkan module rpaf
1 | a2enmod rpaf |
Tes konfigurasi Apache
1 | apachectl -t |
Restart Apache
1 | systemctl restart apache2 |
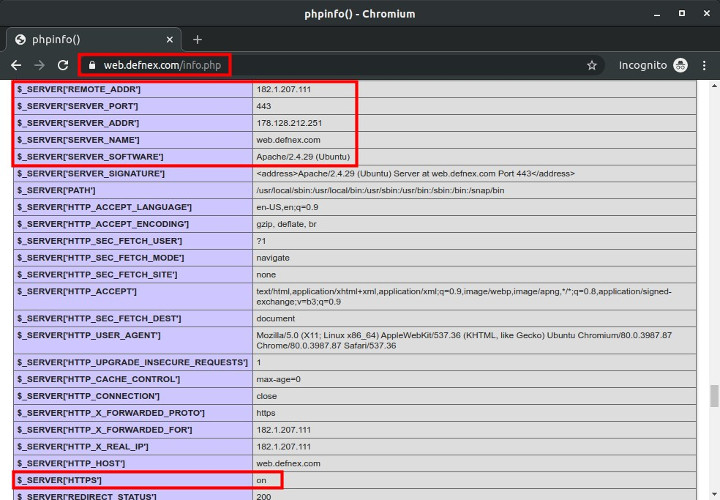
Browse http://web.defnex.com/info.php, cek REMOTE_ADDR, harus berisi Public IP address dari komputer visitor

7.Setting HTTPS
Install SSL Let’s Encrypt untuk mengaktifkan HTTPS
1 2 3 | cd add-apt-repository ppa:certbot/certbot apt install python-certbot-nginx -y |
Generate SSL untuk subdomain web.defnex.com yang berada di Nginx
1 | certbot --nginx -d web.defnex.com |
Masukkan alamat email
1 | Enter email address (used for urgent renewal and security notices) (Enter 'c' to cancel): hai@musaamin.web.id |
Setujui ToS
1 2 3 | Please read the Terms of Service at https://letsencrypt.org/documents/ LE-SA-v1.2-November-15-2017.pdf. You must agree in order to register with the ACME server at https://acme-v02.api.letsencrypt.org/directory - - - - - - - - - - - - - - - - - - - - - - - - - - - (A)gree/(C)ancel: A |
Persetujuan untuk dikirimi informasi mengenai Let’s Encrypt, bisa jawab Y atau N.
1 2 3 | Would you be willing to share your email address with the Electronic Frontier Foundation, a founding partner of the Let's Encrypt project and the non-profit organization that develops Certbot? We'd like to send you email about our work encrypting the web, EFF news, campaigns, and ways to support digital freedom. - - - - - - - - - - - - - - - - - - - - - - - - - - - (Y)es/(N)o: N |
Sertifikat SSL dibuat, mengubah dan menambahkan konfigurasi virtual host untuk SSL.
1 2 3 | Obtaining a new certificate Performing the following challenges: http-01 challenge for web.defnex.com |
Kemudian pilih 2 untuk redirect HTTP ke HTTPS.
1 2 3 4 5 6 | Please choose whether or not to redirect HTTP traffic to HTTPS, removing HTTP access. - - - - - - - - - - - - - - - - - - - - - - - - - - - - - - - - - - - - - - - - 1: No redirect - Make no further changes to the webserver configuration. 2: Redirect - Make all requests redirect to secure HTTPS access. Choose this for new sites, or if you're confident your site works on HTTPS. You can undo this change by editing your web server's configuration. - - - - - - - - - - - - - - - - - - - - - - - - - - - - - - - - - - - - - - - - Select the appropriate number [1-2] then [enter] (press 'c' to cancel): 2 |
Install SSL untuk web.defnex.com selesai
1 | Congratulations! You have successfully enabled https://web.defnex.com |
Sertifikat SSL hanya berlaku selama 90 hari, renew untuk memperbarui sertifikat SSL
1 | cerbot renew |
Browse https://web.defnex.com/info.php, cek $_SERVER[‘SERVER_PORT’] dan $_SERVER[‘HTTPS’]
8.Blokir Akses Langsung ke Apache
Blokir akses langsung ke Apache pada port 8080 dengan menggunakan iptables.
Format rule firewall, ganti IP_SERVER
1 | iptables -I INPUT -p tcp --dport 8080 ! -s IP_SERVER -j REJECT --reject-with tcp-reset |
IP_SERVER menggunakan 178.128.212.251
1 | iptables -I INPUT -p tcp --dport 8080 ! -s 178.128.212.251 -j REJECT --reject-with tcp-reset |
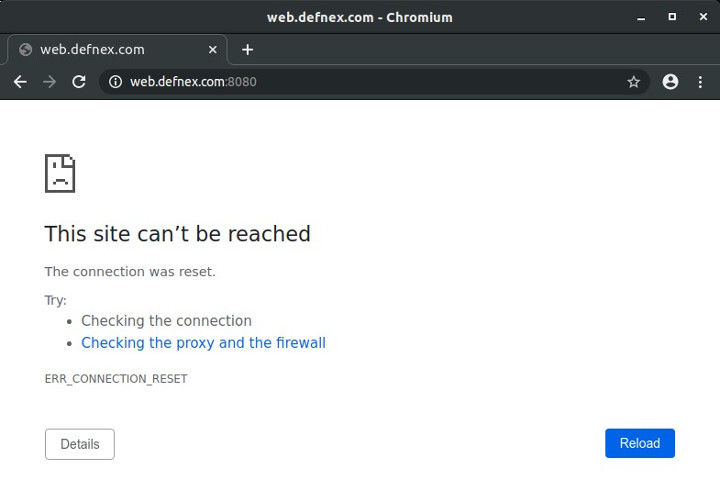
Tes iptables rule dengan mengakses http://web.defnex.com:8080, hasilnya ERR_CONNECTION_RESET
Selamat mencoba 🙂

Cara install PHPmyadminnya bagaimana om?
install aja secara manual, download phpmyadmin lalu extract ke
/var/www/html, aksesnya pakaihttp://ipserver/phpmyadminPilihan webservernya nanti apache2 atau biarkan kosong om ?
setting di nginx.conf agar bisa eksekusi file .php
om saya udh aktifkan rpaf sesuai tutor, tetapi pas di akses info.php remote_addr bukan berisi ip visitor tetapi gateway server
om setelah step ke 8, pas akses info.php langsung status 502 itu kenapa ya
cek error log
(111: Connection refused) while connecting to upstream, client: 192.168.90.1, server:
gagal konek ke upstream server
cek kembali confignya
Kalau web server xampp windows, nginx reverse proxy di ubuntu, supaya bisa pakai https bagaimana pak?
SSL dipasang di Nginx