How to Configure Nginx + SSL As a Reverse Proxy for Apache on Ubuntu 18.04

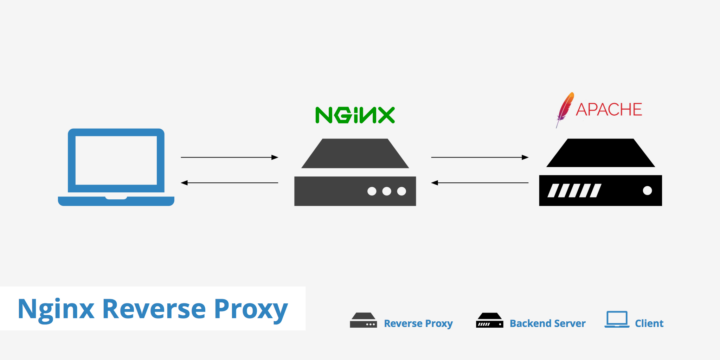
Nginx and Apache can be used simultaneously where Nginx acts as a reverse proxy that accepts requests from clients and forwards them to other web servers such as Apache, then Apache sends back the response requested by Nginx to be sent to the client. This is done so that the two web servers can cover each other’s shortcomings.
0.Install Apache
Install Apache web server
1 2 | apt update apt install apache2 php-fpm -y |
Install FastCGI module
1 2 | wget https://mirrors.edge.kernel.org/ubuntu/pool/multiverse/liba/libapache-mod-fastcgi/libapache2-mod-fastcgi_2.4.7~0910052141-1.2_amd64.deb dpkg -i libapache2-mod-fastcgi_2.4.7~0910052141-1.2_amd64.deb |
1.Setting Apache
Rename the Apache port.conf configuration file
1 | mv /etc/apache2/ports.conf /etc/apache2/ports.conf.default |
Create a new port.conf file with port number 8080
1 | echo "Listen 8080" | tee /etc/apache2/ports.conf |
Disable the 000-default Apache virtual host
1 | a2dissite 000-default |
Create a virtual host configuration file
1 | vim /etc/apache2/sites-available/001-default.conf |
Enter the 001-default.conf configuration
1 2 3 4 5 6 | <VirtualHost *:8080> ServerAdmin webmaster@localhost DocumentRoot /var/www/html ErrorLog ${APACHE_LOG_DIR}/error.log CustomLog ${APACHE_LOG_DIR}/access.log combined </VirtualHost> |
Activate virtual host 001-default.conf
1 | a2ensite 001-default |
Restart Apache
1 | systemctl restart apache2 |
Verify that Apache is already running on port 8080
1 | netstat -tulpn |
The results show that apache2 runs on port 8080
1 2 3 4 5 6 | Active Internet connections (only servers) Proto Recv-Q Send-Q Local Address Foreign Address State PID/Program name tcp 0 0 127.0.0.53:53 0.0.0.0:* LISTEN 870/systemd-resolve tcp 0 0 0.0.0.0:22 0.0.0.0:* LISTEN 1065/sshd tcp6 0 0 :::8080 :::* LISTEN 8774/apache2 tcp6 0 0 :::22 :::* LISTEN 1065/sshd |
2.Configure Apache to use FastCGI
Activate the actions module
1 | a2enmod actions |
Rename the FastCGI configuration file
1 | mv /etc/apache2/mods-enabled/fastcgi.conf /etc/apache2/mods-enabled/fastcgi.conf.default |
Create a new configuration file for FastCGI
1 | vim /etc/apache2/mods-enabled/fastcgi.conf |
Memasukkan konfigurasi FastCGI
1 2 3 4 5 6 7 8 9 10 11 | <IfModule mod_fastcgi.c> AddHandler fastcgi-script .fcgi FastCgiIpcDir /var/lib/apache2/fastcgi AddType application/x-httpd-fastphp .php Action application/x-httpd-fastphp /php-fcgi Alias /php-fcgi /usr/lib/cgi-bin/php-fcgi FastCgiExternalServer /usr/lib/cgi-bin/php-fcgi -socket /run/php/php7.2-fpm.sock -pass-header Authorization <Directory /usr/lib/cgi-bin> Require all granted </Directory> </IfModule> |
Apache configuration test
1 | apachectl -t |
The result is Syntax OK, restart Apache
1 | systemctl restart apache2 |
3.PHP Verification
Verify that the PHP script can be run by Apache web server
Create info.php file to call the phpinfo function
1 | echo "<?php phpinfo(); ?>" | tee /var/www/html/info.php |
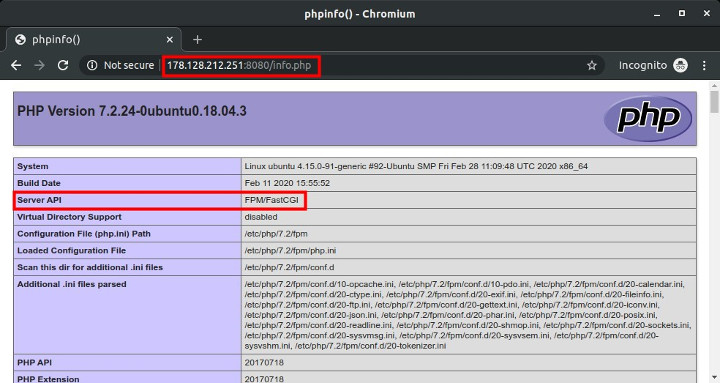
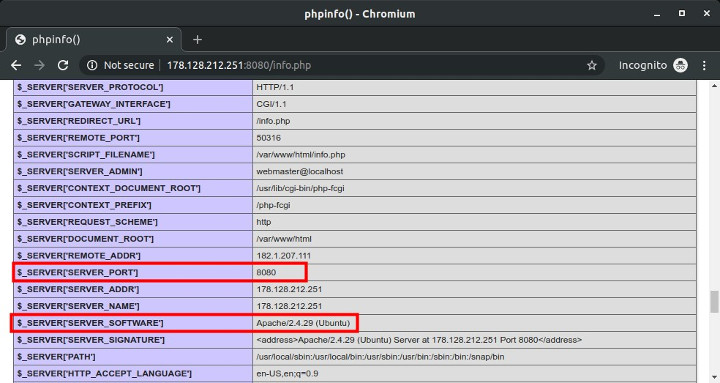
Browse http://IP_SERVER:8080/info.php, check Server API, SERVER_PORT, and SERVER_SOFTWARE.
4.Create Apache Virtual Host
Create an Apache virtual host configuration for the web.defnex.com subdomain
Create a document root folder
1 | mkdir /var/www/web.defnex.com |
Create index.html file
1 | echo "<h1>web.defnex.com</h1>" | tee /var/www/web.defnex.com/index.html |
Create info.php file
1 | echo "<?php phpinfo(); ?>" | tee /var/www/web.defnex.com/info.php |
Create a virtual host file for web.defnex.com
1 | vim /etc/apache2/sites-available/web.defnex.com.conf |
Enter the virtual host configuration
1 2 3 4 5 6 7 8 9 10 11 | <VirtualHost *:8080> ServerName web.defnex.com DocumentRoot /var/www/web.defnex.com <Directory /var/www/web.defnex.com> Options Indexes FollowSymLinks MultiViews AllowOverride All Require all granted </Directory> ErrorLog /var/log/apache2/web.defnex.com_error.log CustomLog /var/log/apache2/web.defnex.com_access.log combined </VirtualHost> |
Activating virtual host
1 | a2ensite web.defnex.com |
Apache configuration test
1 | apachectl -t |
Restart Apache
1 | systemctl restart apache2 |
Verify that the virtual host configuration is functioning properly, browse http: //web.defnex.com: 8080

5.Install and Configure Nginx
Install Nginx
1 | apt install nginx -y |
Create a Nginx server block configuration for web.defnex.com
1 | vim /etc/nginx/conf.d/web.defnex.com.conf |
Enter the server block configuration
1 2 3 4 5 6 7 8 9 10 11 12 13 14 15 16 17 18 19 20 21 22 23 24 25 | server { listen 80; server_name web.defnex.com; root /var/www/web.defnex.com; index index.php index.htm index.html; location / { try_files $uri $uri/ /index.php?$query_string; } location ~ \.php$ { proxy_pass http://178.128.212.251:8080; proxy_set_header Host $host; proxy_set_header X-Real-IP $remote_addr; proxy_set_header X-Forwarded-For $proxy_add_x_forwarded_for; proxy_set_header X-Forwarded-Proto $scheme; } location ~ /\.ht { deny all; } access_log /var/log/nginx/web.defnex.com_access.log; error_log /var/log/nginx/web.defnex.com_error.log warn; } |
Nginx configuration test
1 | nginx -t |
The result
1 2 | nginx: the configuration file /etc/nginx/nginx.conf syntax is ok nginx: configuration file /etc/nginx/nginx.conf test is successful |
Restart Nginx
1 2 | systemctl restart nginx systemctl status nginx |
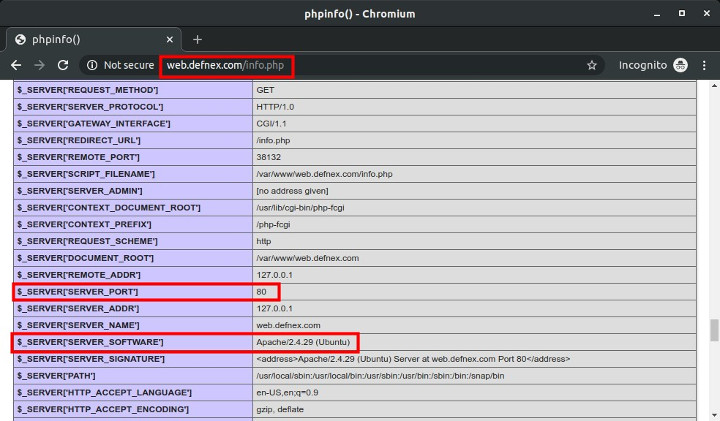
Verify the Nginx reverse proxy by accessing http://web.defnex.com/info.php
6.Install and Configure mod_rpaf
Apache module mod_rpaf rewrites values from REMOTE_ADDR, HTTPS and HTTP_PORT. If without this module, what is read in the Apache log is IP from Nginx, not from visitors.
Install the packages needed to build the module
1 | apt install unzip build-essential apache2-dev -y |
Download the mod_rpaf source code from GitHub
1 | wget https://github.com/gnif/mod_rpaf/archive/stable.zip -O mod_rpaf.zip |
Extract the mod_rpaf.zip file
1 | unzip mod_rpaf.zip |
Compile mod_rpaf
1 2 3 | cd mod_rpaf-stable make make install |
Create the rpaf.load file
1 | vim /etc/apache2/mods-available/rpaf.load |
Memasukkan konfigurasi load module
1 | LoadModule rpaf_module /usr/lib/apache2/modules/mod_rpaf.so |
Create a rpaf.conf configuration file
1 | vim /etc/apache2/mods-available/rpaf.conf |
Entering the module configuration, RPAF_ProxyIPs is filled with SERVER_IP
1 2 3 4 5 6 7 8 | <IfModule mod_rpaf.c> RPAF_Enable On RPAF_Header X-Real-Ip RPAF_ProxyIPs 178.128.212.251 RPAF_SetHostName On RPAF_SetHTTPS On RPAF_SetPort On </IfModule> |
Activate the rpaf module
1 | a2enmod rpaf |
Apache configuration test
1 | apachectl -t |
Restart Apache
1 | systemctl restart apache2 |
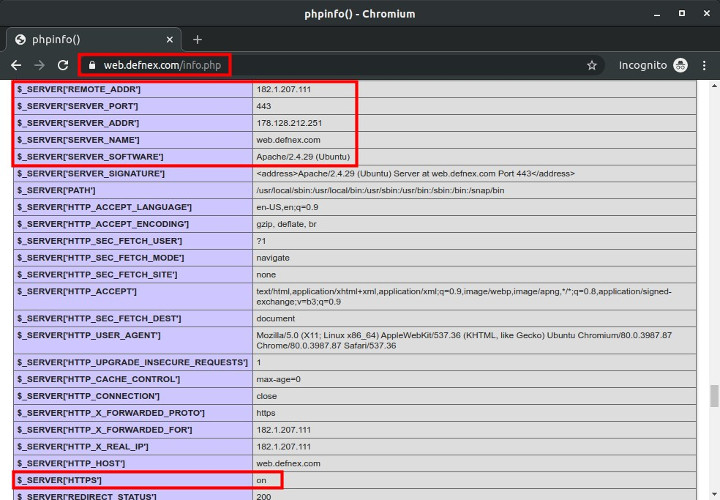
Browse http://web.defnex.com/info.php, check REMOTE_ADDR, must contain the Public IP address of the visitor’s computer

7.Configure HTTPS
Install SSL Let’s Encrypt to enable HTTPS
1 2 3 | cd add-apt-repository ppa:certbot/certbot apt install python-certbot-nginx -y |
Generate an SSL certificate for the web.defnex.com subdomain located in Nginx
1 | certbot --nginx -d web.defnex.com |
Enter email address
1 | Enter email address (used for urgent renewal and security notices) (Enter 'c' to cancel): hai@musaamin.web.id |
Agree ToS
1 2 3 | Please read the Terms of Service at https://letsencrypt.org/documents/ LE-SA-v1.2-November-15-2017.pdf. You must agree in order to register with the ACME server at https://acme-v02.api.letsencrypt.org/directory - - - - - - - - - - - - - - - - - - - - - - - - - - - (A)gree/(C)ancel: A |
Consent to be sent information about Let’s Encrypt, you can answer Y or N.
1 2 3 | Would you be willing to share your email address with the Electronic Frontier Foundation, a founding partner of the Let's Encrypt project and the non-profit organization that develops Certbot? We'd like to send you email about our work encrypting the web, EFF news, campaigns, and ways to support digital freedom. - - - - - - - - - - - - - - - - - - - - - - - - - - - (Y)es/(N)o: N |
An SSL certificate was created, changed and added a virtual host configuration for SSL.
1 2 3 | Obtaining a new certificate Performing the following challenges: http-01 challenge for web.defnex.com |
Then select 2 to redirect HTTP to HTTPS.
1 2 3 4 5 6 | Please choose whether or not to redirect HTTP traffic to HTTPS, removing HTTP access. - - - - - - - - - - - - - - - - - - - - - - - - - - - - - - - - - - - - - - - - 1: No redirect - Make no further changes to the webserver configuration. 2: Redirect - Make all requests redirect to secure HTTPS access. Choose this for new sites, or if you're confident your site works on HTTPS. You can undo this change by editing your web server's configuration. - - - - - - - - - - - - - - - - - - - - - - - - - - - - - - - - - - - - - - - - Select the appropriate number [1-2] then [enter] (press 'c' to cancel): 2 |
The SSL certificate installation for web.defnex.com is complete
1 | Congratulations! You have successfully enabled https://web.defnex.com |
The SSL certificate is only valid for 90 days, run the renew command to renew the SSL certificate
1 | cerbot renew |
Browse https://web.defnex.com/info.php, check $_SERVER[‘SERVER_PORT’] and $_SERVER[‘HTTPS’]
8.Block Direct Access to Apache
Block direct access to Apache on port 8080 using iptables.
Format the firewall rule, change SERVER_IP
1 | iptables -I INPUT -p tcp --dport 8080 ! -s SERVER_IP -j REJECT --reject-with tcp-reset |
SERVER_IP uses 178.128.212.251
1 | iptables -I INPUT -p tcp --dport 8080 ! -s 178.128.212.251 -j REJECT --reject-with tcp-reset |
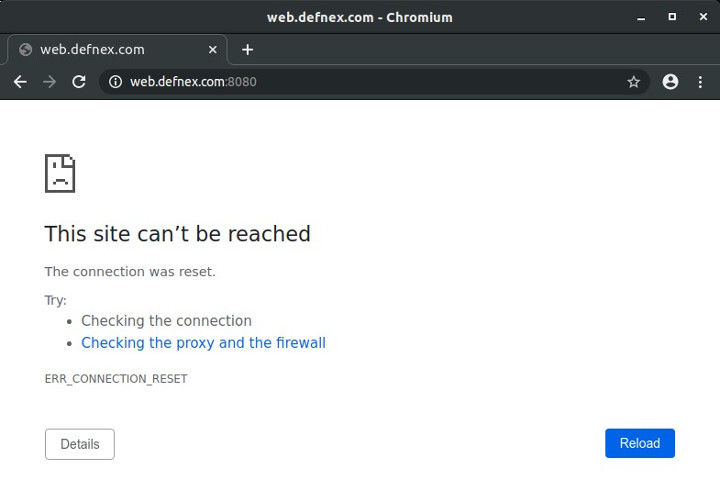
iptables rule test by accessing http: //web.defnex.com: 8080, the result is ERR_CONNECTION_RESET
If you found this article helpful and would like to support my work, consider making a donation through PayPal. Your support helps me continue creating useful content and tutorials. Thank you!
Donate via PayPal: https://paypal.me/musaamin

error
/usr/local/src# dpkg -i libapache2-mod-fastcgi_2.4.7~0910052141-1.2_amd64.deb
Selecting previously unselected package libapache2-mod-fastcgi.
(Reading database … 225237 files and directories currently installed.)
Preparing to unpack libapache2-mod-fastcgi_2.4.7~0910052141-1.2_amd64.deb …
Unpacking libapache2-mod-fastcgi (2.4.7~0910052141-1.2) …
Setting up libapache2-mod-fastcgi (2.4.7~0910052141-1.2) …
dpkg: error processing package libapache2-mod-fastcgi (–install):
installed libapache2-mod-fastcgi package post-installation script subprocess returned error exit status 1
Errors were encountered while processing:
libapache2-mod-fastcgi
mohon petunjuk nya
coba
apt install --fix-missing. tidak harus pakai php-fpm, bisa pakai apache module php. lihat versi videonya di Cara Setting Nginx + SSL Sebagai Reverse Proxy untuk Apache di Ubuntu 18.04saya sudah berhasil reverse proxy, cuma ada masalah di mode rewrite .htaacess tidak bisa jalan atau page not found.
ada solusi om?
aktifkan module rewrite di apache, dan konfigurasi apache virtual host
sudah saya coba, malah link nya pas diklik jadi ter download, mohon petunjuk. terimakasih
sudah restart apache? pakai php-fpm? sudah nyambung ke php-fpm? sudah bisa eksekusi .php? test pakai phpinfo.